
Back
EzyCourse Coaching Program
What is it & why you need it
We are extremely excited to bring the Coaching Program feature to EzyCourse!
Yes, you can now offer impactful 1:1 and group coaching experiences directly from your platform. Whether you want to run structured weekly programs, flexible self-paced sessions, or continuous batch-based coaching, this feature is built to adapt to your unique coaching style.
You can add learning materials with 9 different lessons, assign tasks and exercises, monitor client submissions, and easily track their performance using different built-in trackers.
This will help you to manage your own coaching system and let you serve clients to build their habits, develop skills, and achieve long-term transformation.
How it works
This feature will let you offer 1:1 and group coaching to your clients. You can choose the number of clients permitted to join the program.
For your coaching session, you can use four variations -
Week based: Coaching sessions are structured around weeks (e.g., Week 1: Mindset, Week 2: Strategy, and so on). You can select the week days when the sessions will take place. And also define the start-end date of the program.
Non-week or Session based: These are not tied to any specific date or week. This type will have the program divided into sessions and subsessions. And clients can complete the program at their own pace.
Continuous: You can use this session type to run a batch system coaching program. You select the start date of the program and select the week days when the sessions will take place. And the main difference is you define the duration (in days) the program will continue for. After the duration ends, a new batch will start.
Evergreen: Phase based coaching program where you can deliver content gradually while ensuring every client gets the right content at the right time. Ideal for maternity program, phase based mentorship, transformations, etc.
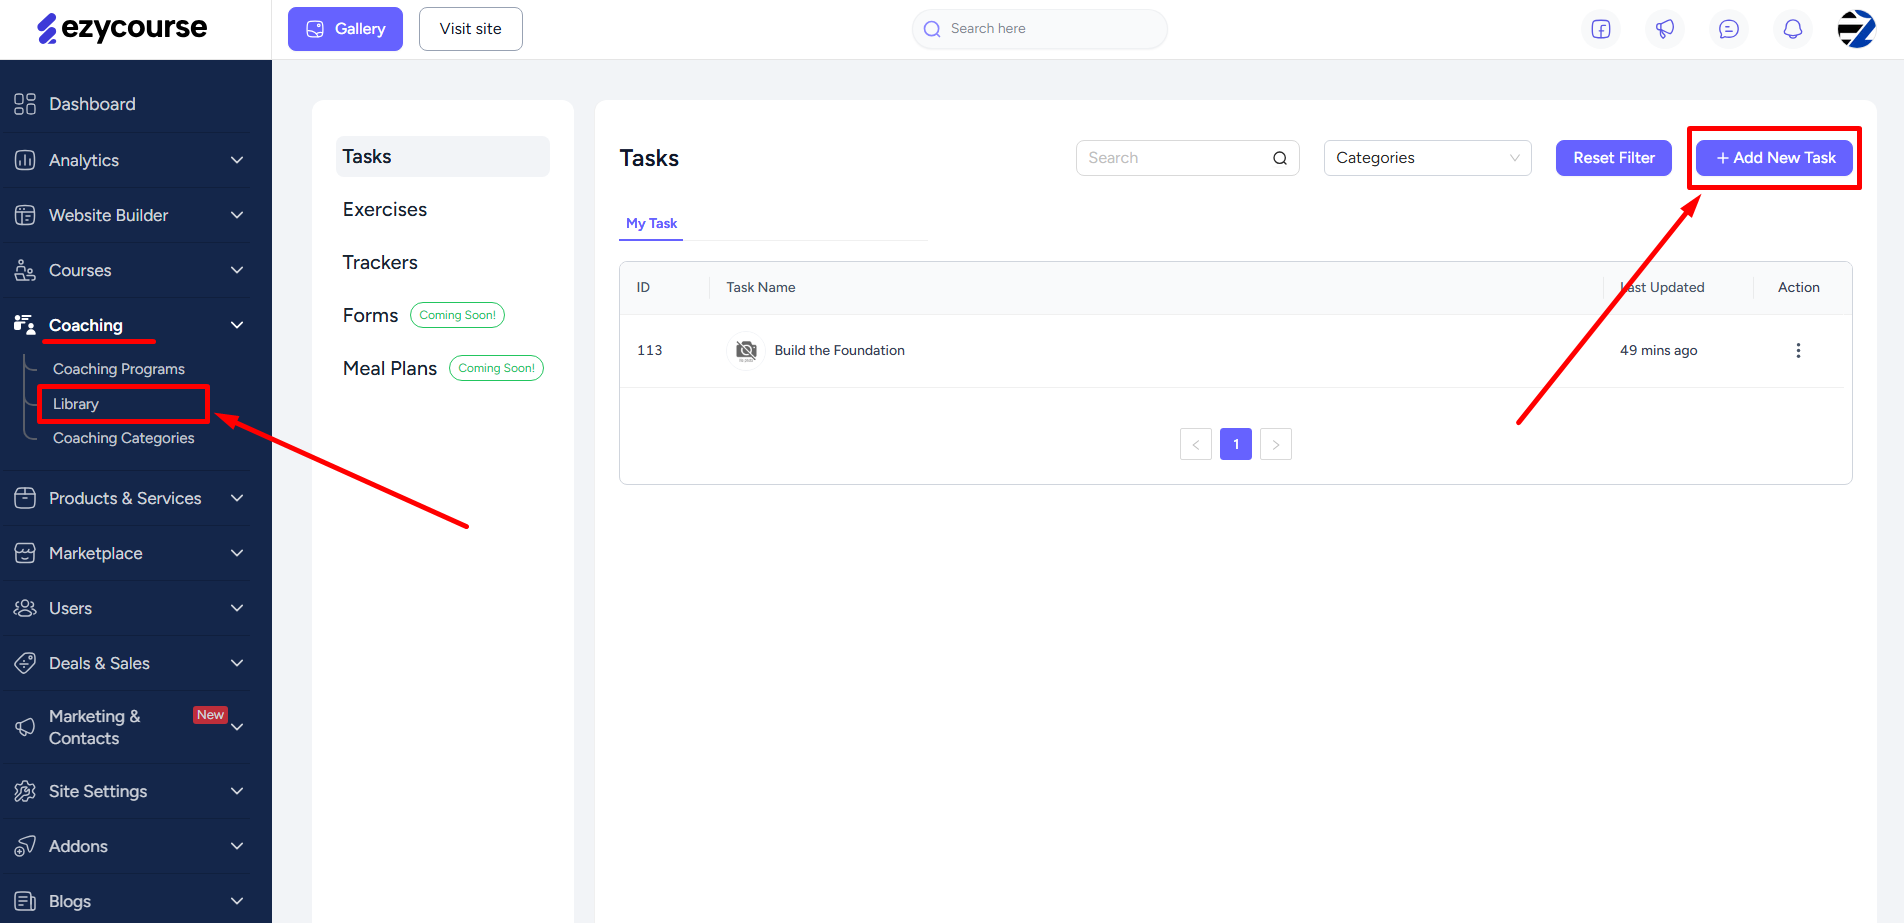
For adding activities, you’ll find a sub-menu called Library under the Coaching menu. This is where you can add two kinds of activities: Task and Exercise. While both have a similarity, you can use them for different purposes. For example, use exercises to make clients practice something and use tasks for giving clear instruction or assignment to your clients.
There’s also two other options you’ll find in Lessons and Trackers. Lessons contain the library of learning materials in different formats like video, text, audio, etc. Trackers are used to take assessments within any task or exercise, or even independently. And these help to generate the performance metrics or visually showcase different graphs representing the behavior/report of the clients.
Four types of trackers are -
1. Number: Used for tracking numeric input from clients. Use it to measure quantitative progress like tracking daily steps, weight, or monitoring water intake, sleep hours, etc.
2. Question: Ask open-ended questions and gather free written responses from clients. You can use this to track client moods, ask self reflection questions, etc. to assess clients’ mindset and self-awareness.
3. Select One: This helps to let clients select one option from predefined answers. You can use it to quickly figure out their choices about any topic in a structured way. Examples - Let them select emotional state, type of workout, meal type, diet quality, etc.
4. Duration: This will help you to record the time spent on an activity or task. You can utilize this tracker to record the time spent exercising, practice time for a language or new skills.
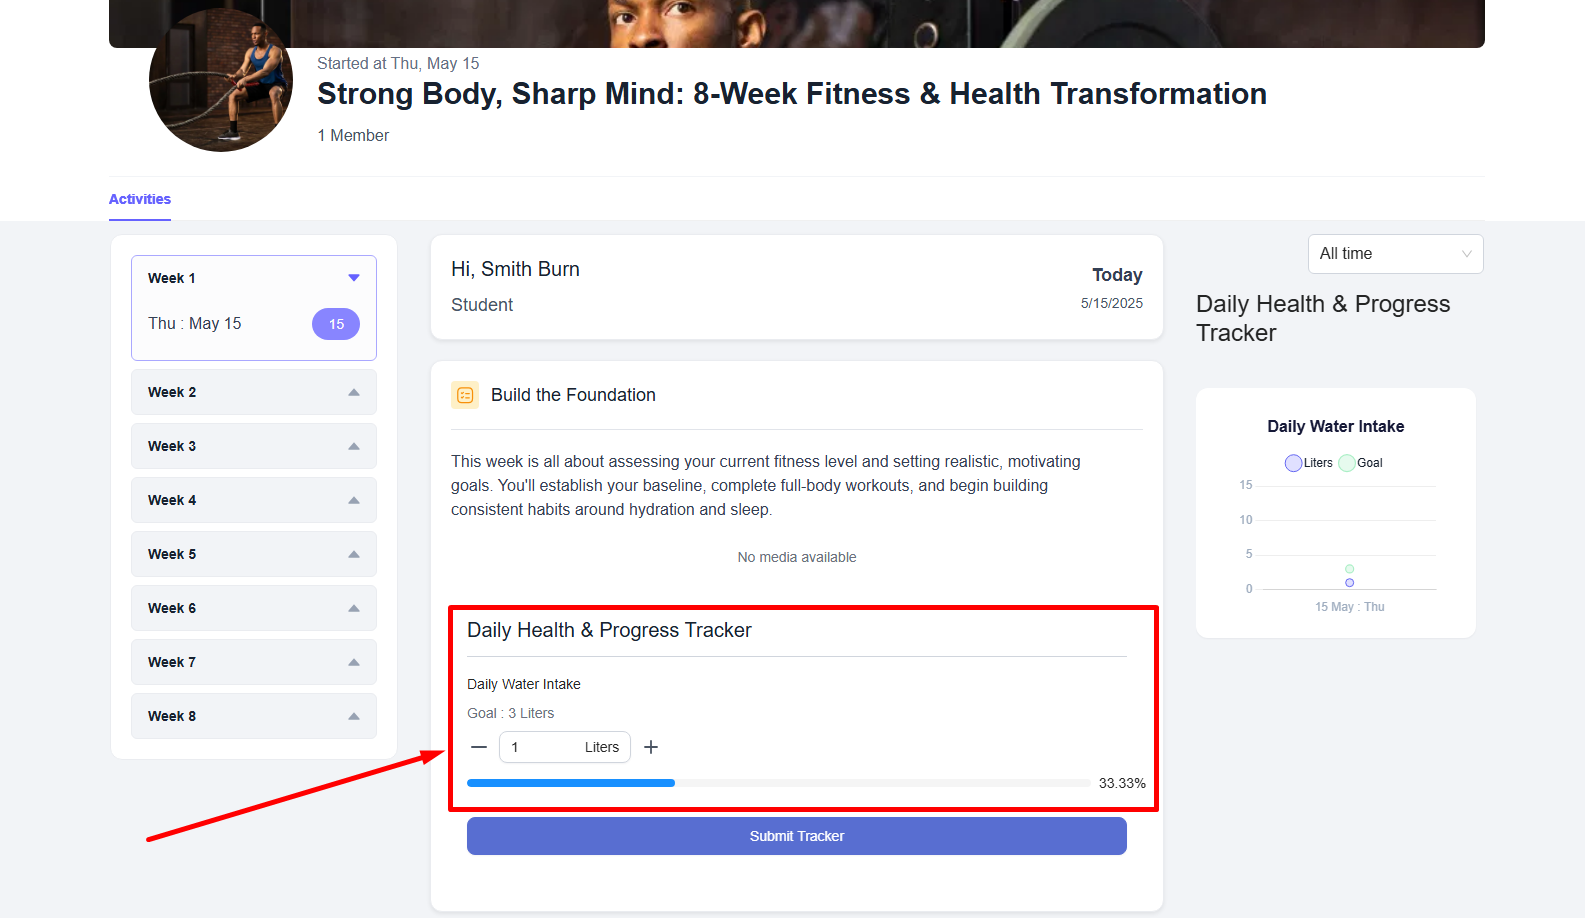
Each coaching program will have a feed where all the session activities, lessons, trackers, tasks, exercises, etc. are showcased to you or the client enrolled into the program.
From the feed, you can add lessons, tasks, and exercises to any particular session (any week day or subsession). Additionally, you can notify your clients via email and dashboard notification regarding any new lessons, tasks, or exercises you add to the program. You can also view all the active clients subscribed to the program. Furthermore, the performance graphs generated from trackers are also viewed inside the feed of a coaching program.
For clients, they also get a similar feed view except that they can of course submit files, answer questions, complete tasks and exercises, and so on from inside the feed.
According to your EzyCourse plan, you’ll be able to have:
1. Essential Plan = 1 program and 20 active clients
2. Pro Plan = 5 programs and 500 active clients
3. Unlimited & Elite Plans = unlimited programs and unlimited active clients
4. AppSumo Users & Equivalent = Unlimited programs and 50 active clients
Creating A New Program
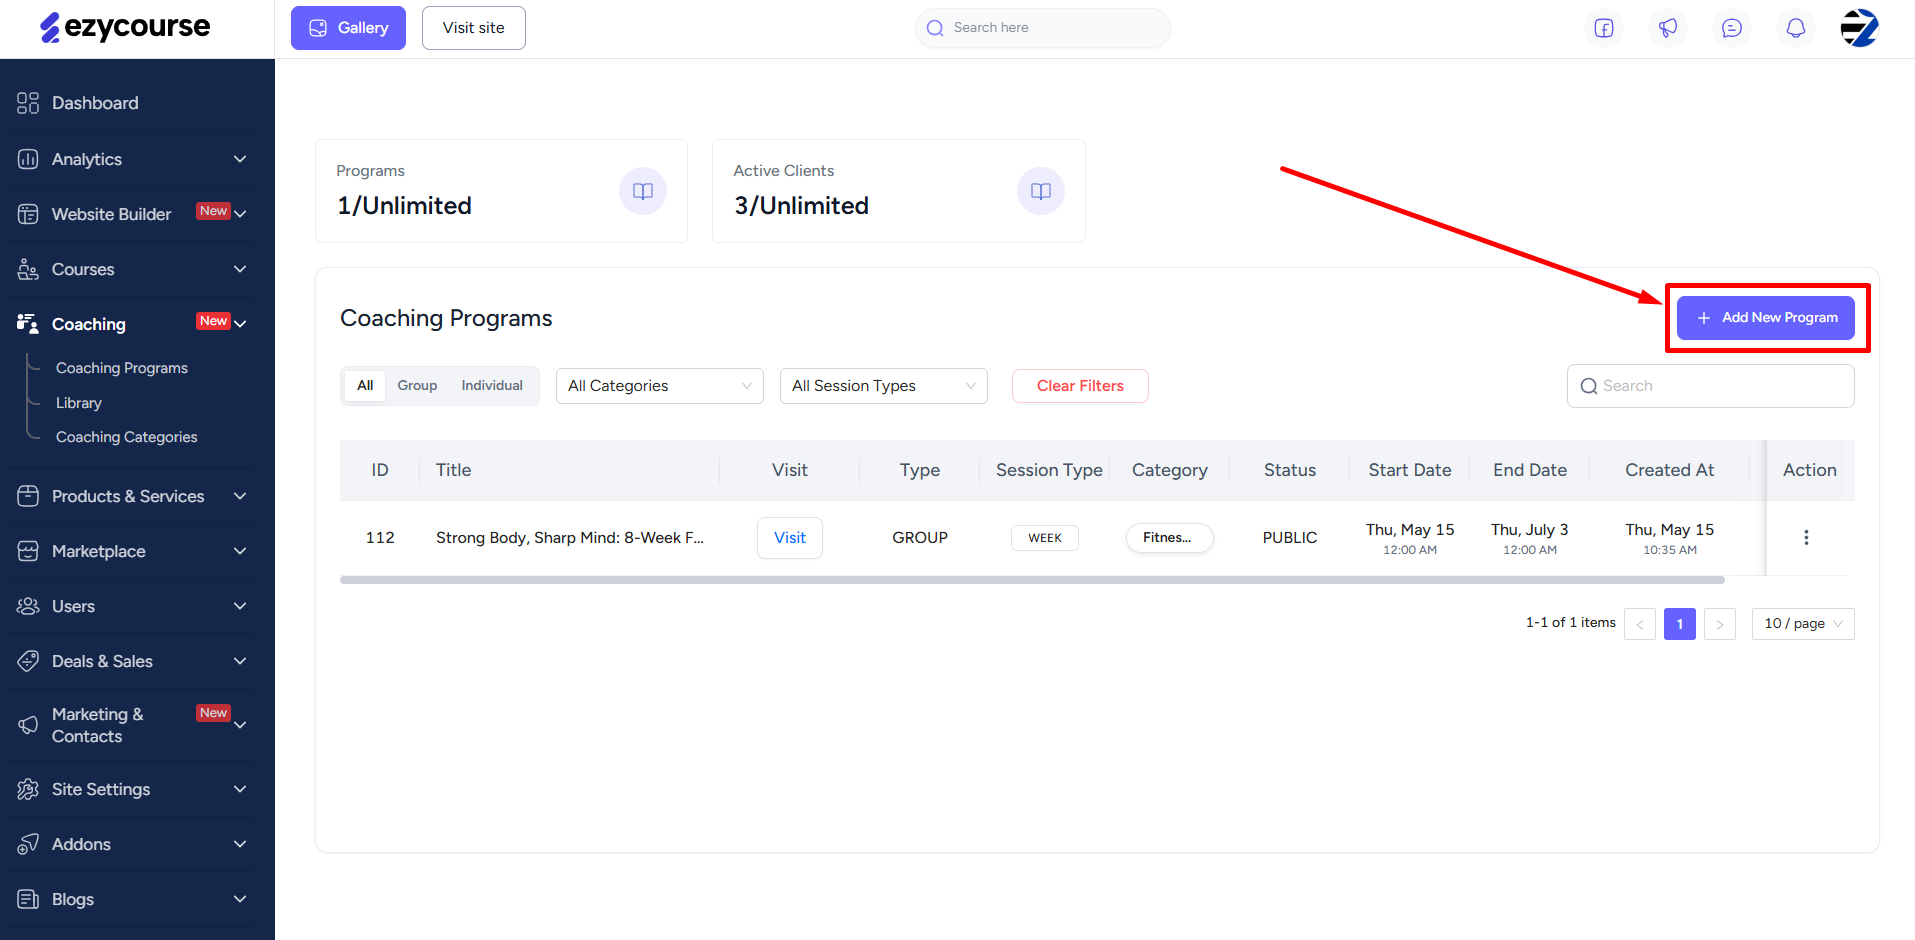
You can get started with all the coaching features from your EzyCourse dashboard. To begin, navigate to Coaching -> Coaching Programs. This is where you’ll find all the existing programs you make. You can also filter your programs easily using various types of filters.

Click the Add New Program button to start creating a new program.
Apart from the title, descriptions, and feature/banner images, you can select the category you want to add this new program into. To create a new category from here, click the add icon (+).
[Note: You can create a program category from the Coaching -> Coaching Categories menu also.]

There are also accessibility settings you can set which work as with any other products on EzyCourse.

You can also limit the number of clients allowed to join the program.

More options will appear based on the type of coaching program you select.
Submission Visibility lets you decide how the clients’ work submissions are visible. The default “Own” option lets only you or the coach see their submissions. Choosing the “All” option makes submissions visible to every active client in the program.

For week-based and continuous type, you can choose whether to allow clients to submit the task/exercise from previous weeks or sessions.

You can turn on the habit tracking system from here. This lets you assign daily or weekly habits to your clients.

There’s one more of these additional options: ‘Allow Enrollment in Current Batch’. This is only for the Continuous coaching type. Enabling it will allow new client enrollments while a batch is already running or started.

Note that none of these additional options are needed in case of the Evergreen coaching. Add feature and banner images which of course appear on the feed. Recommended size for feature image is 144px * 144px and banner image is 1376px * 288px. After you are done with everything, you can click the Create button to finish creating the new program.

Once created, you can set up the pricings for the program including one-time, subscription, donation, etc.

From the Coaching → Coaching Programs menu, you can manage all your programs, including editing, cloning, setting prices, and viewing clients in each program.

Creating A Library: Task, Exercise, Lessons, and Trackers
Library is for creating activities that are later added into the session feed of your coaching programs. There are two types of activities: Tasks and Exercises.
The adding process is very similar for both activities. To create a new task, navigate to Coaching -> Library -> and click the Add New Task button.
Apart from the title and description, you can add the task to a category as you are creating it. You can also create a new category from here and add the task to it.
[Note: This category is not the program category. It is the tasks category to help you organize and easily filter tasks. Same goes for exercises and trackers; they have their own category options.]
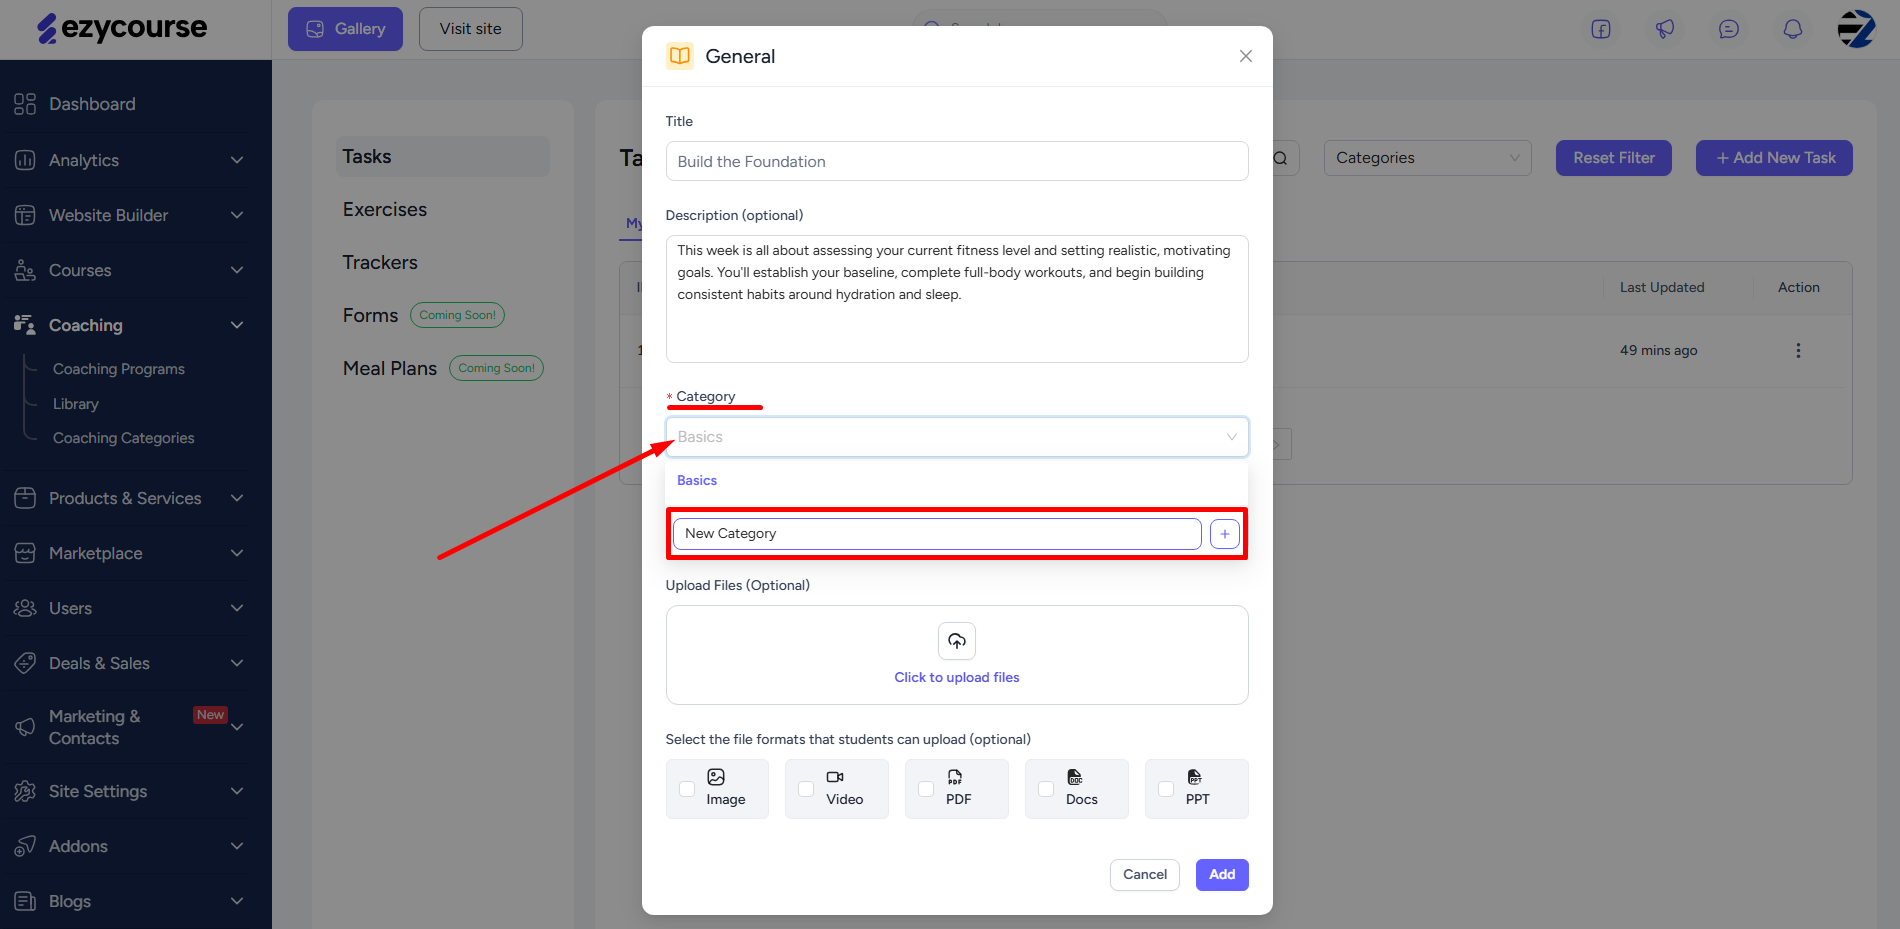
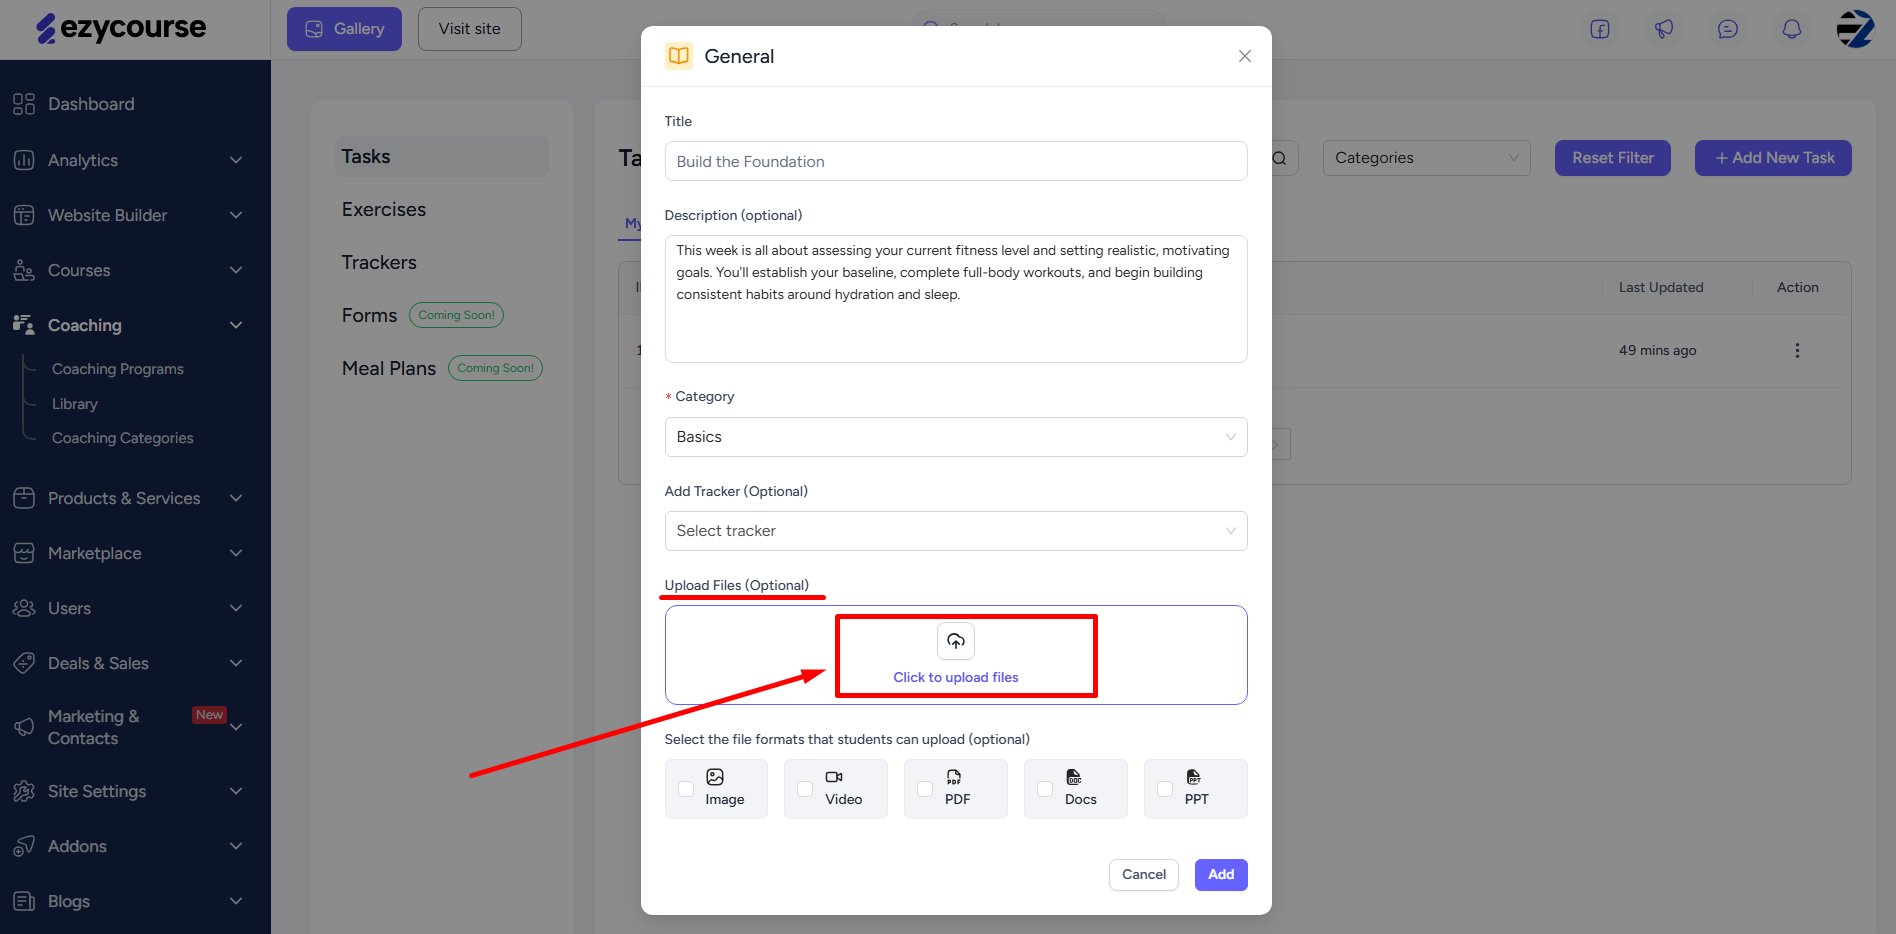
Upload any file for giving the clients instructions or information about the task.
And you can also choose the type of file, if needed, clients need to submit for this task.
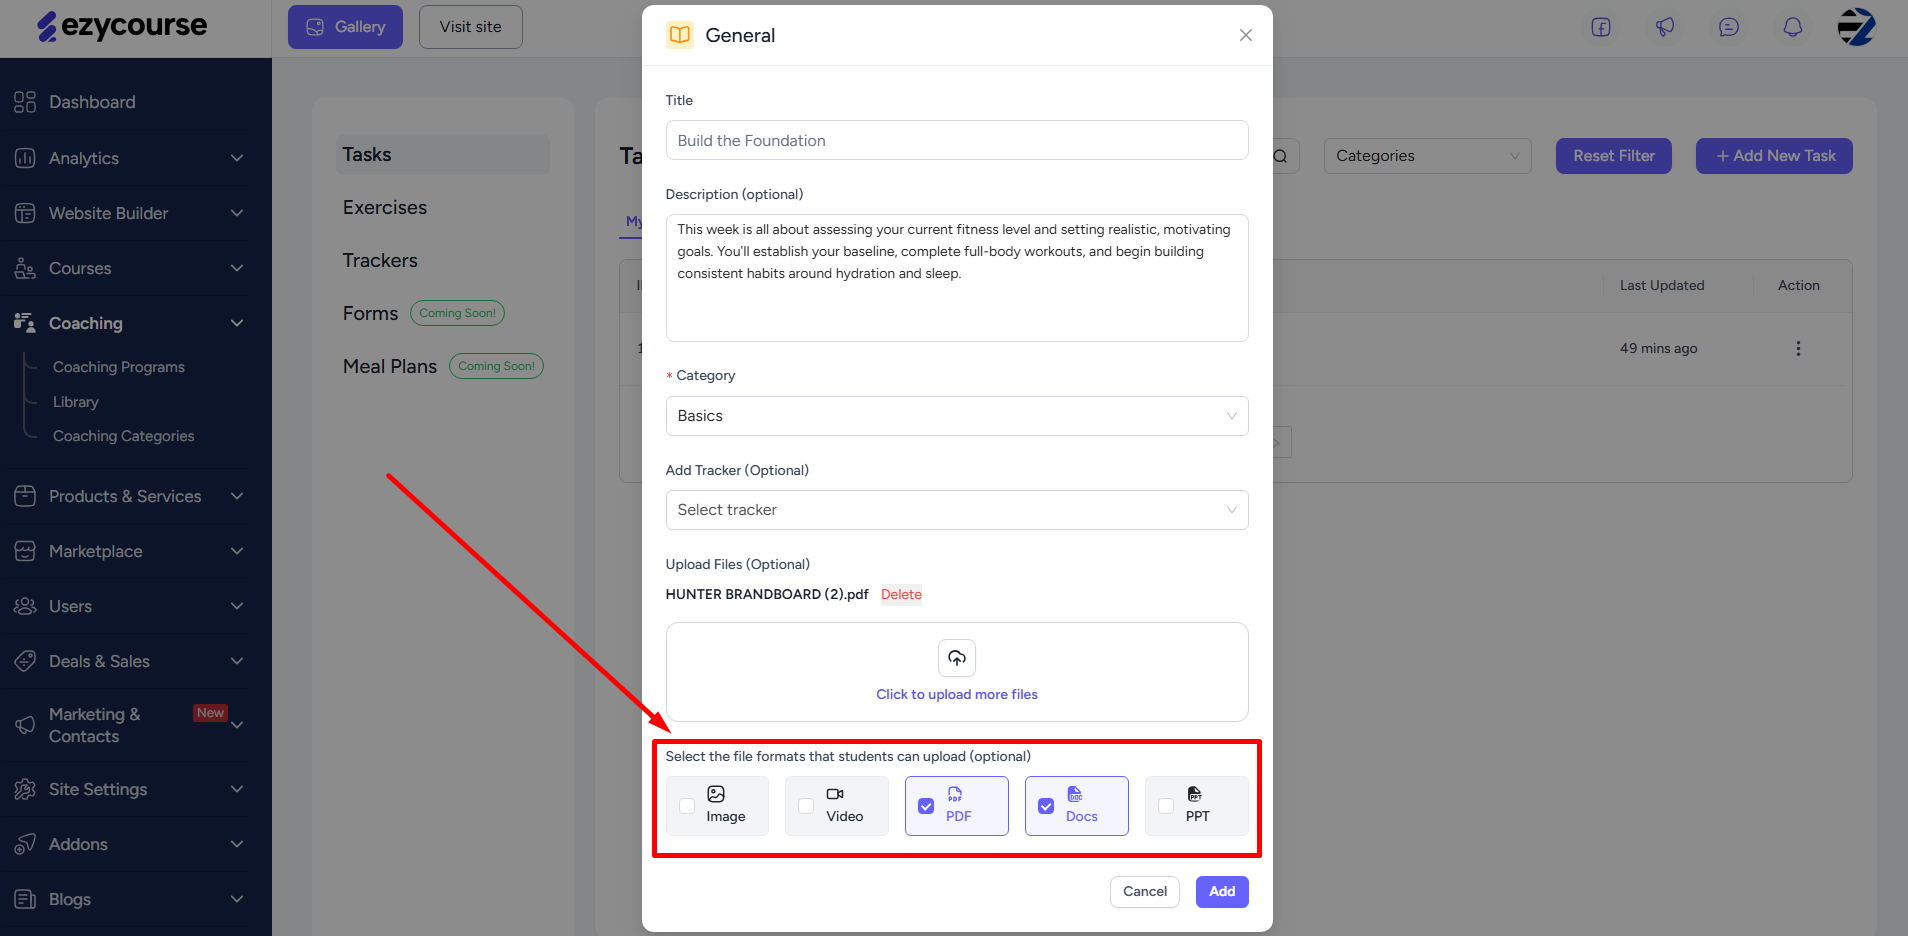
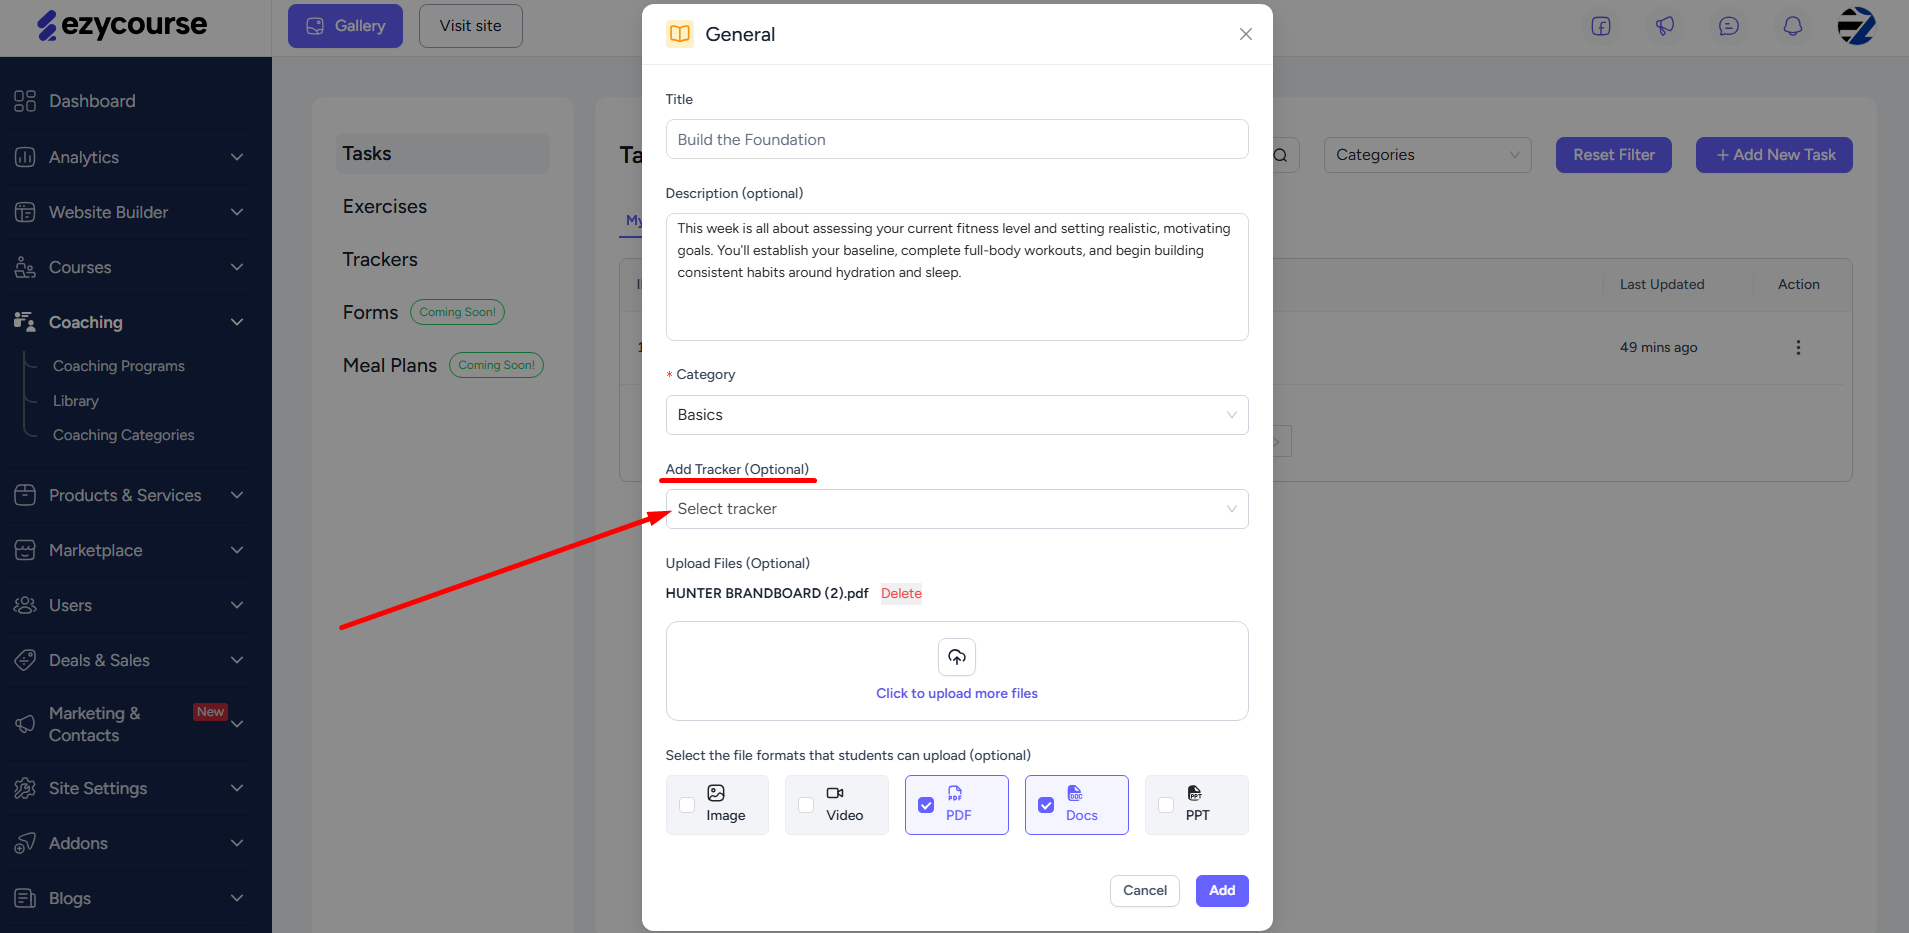
Of course, you can add a tracker to the task. Trackers inside a task or exercise help to assess, track the performance, and make reports of the client.
Follow the same process for creating an exercise.
You can also add lessons in different formats from here. Lessons are used for giving learning materials to your clients.

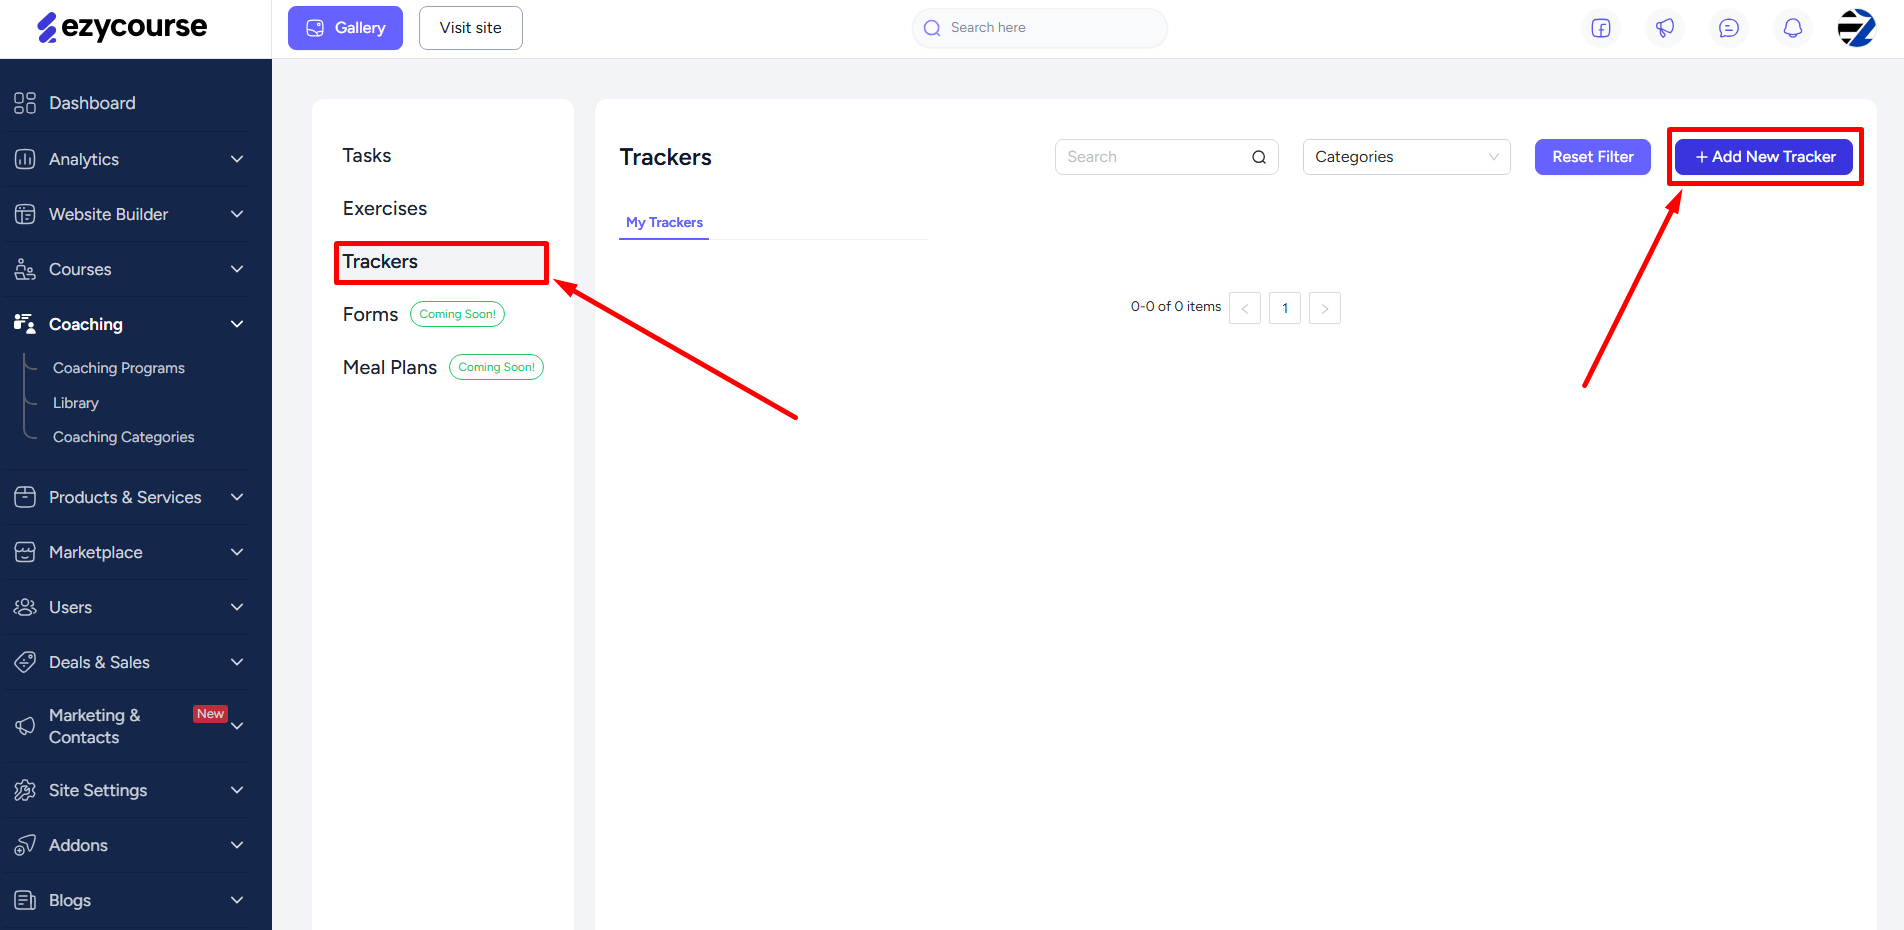
Now, on to Trackers. Go to the Trackers tab to create a new tracker. Click the Add New Tracker button.
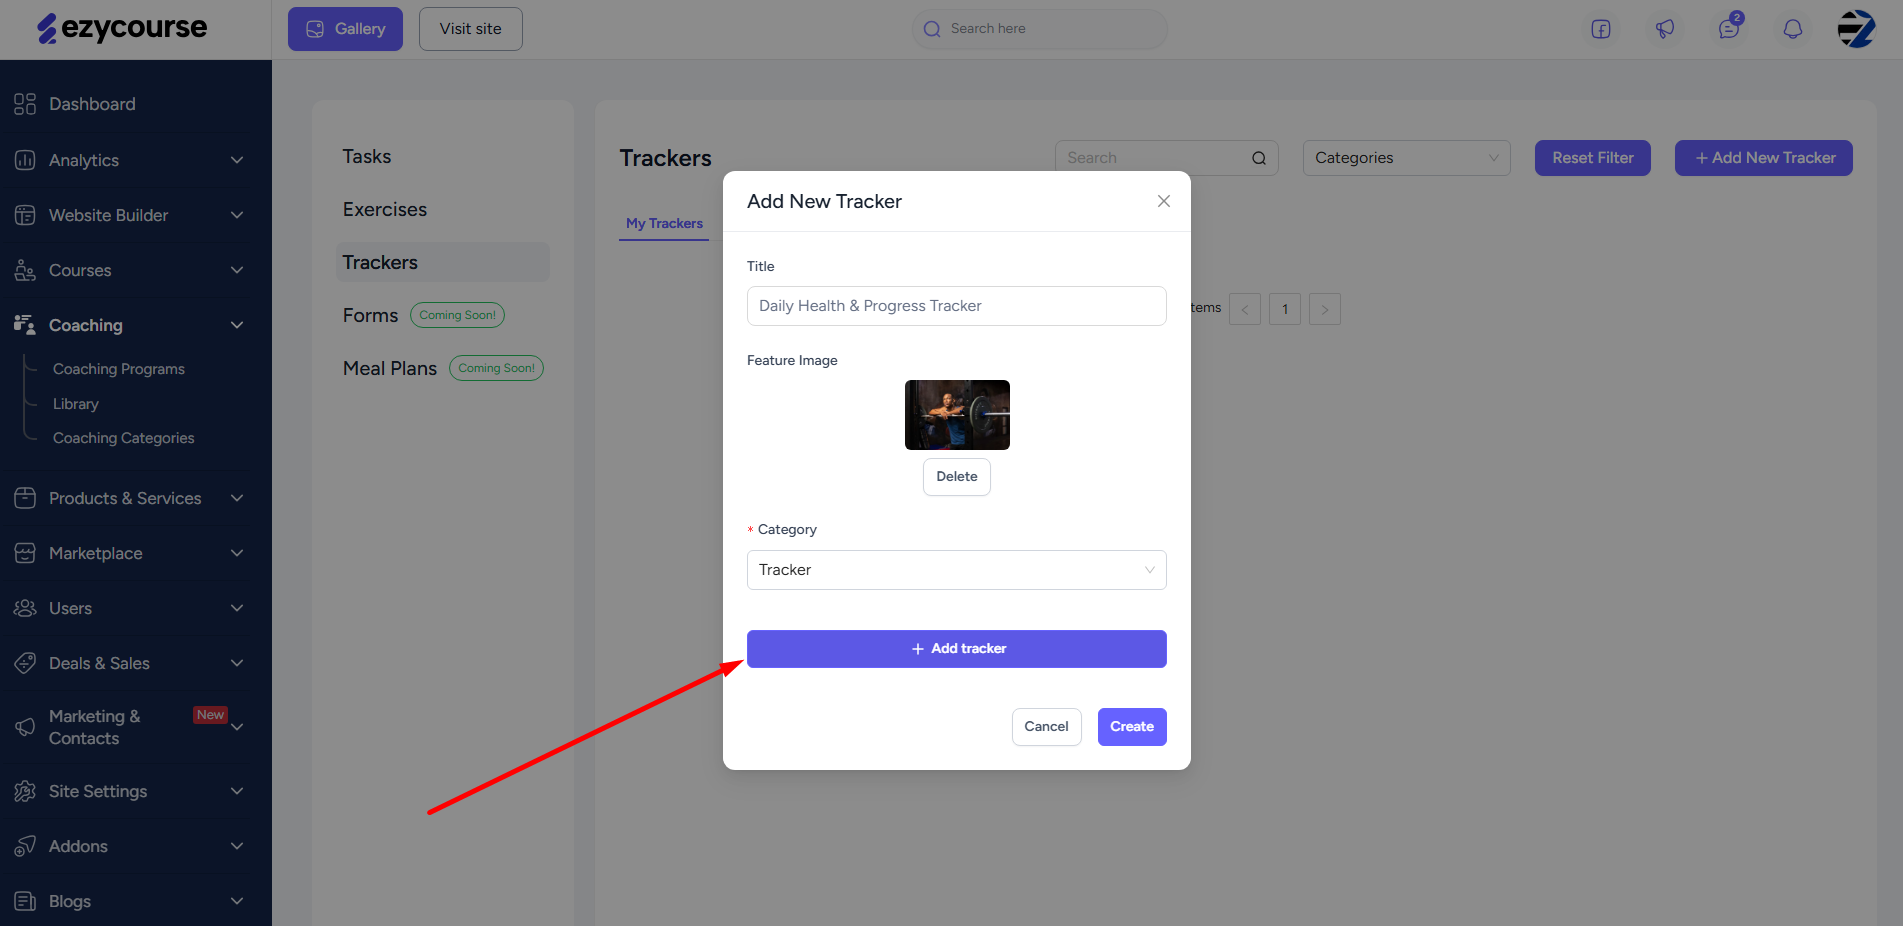
After adding a title, feature image, and selecting a category, you can go on to add any type of tracker. Click the Add Tracker button to reveal all the four types of trackers.
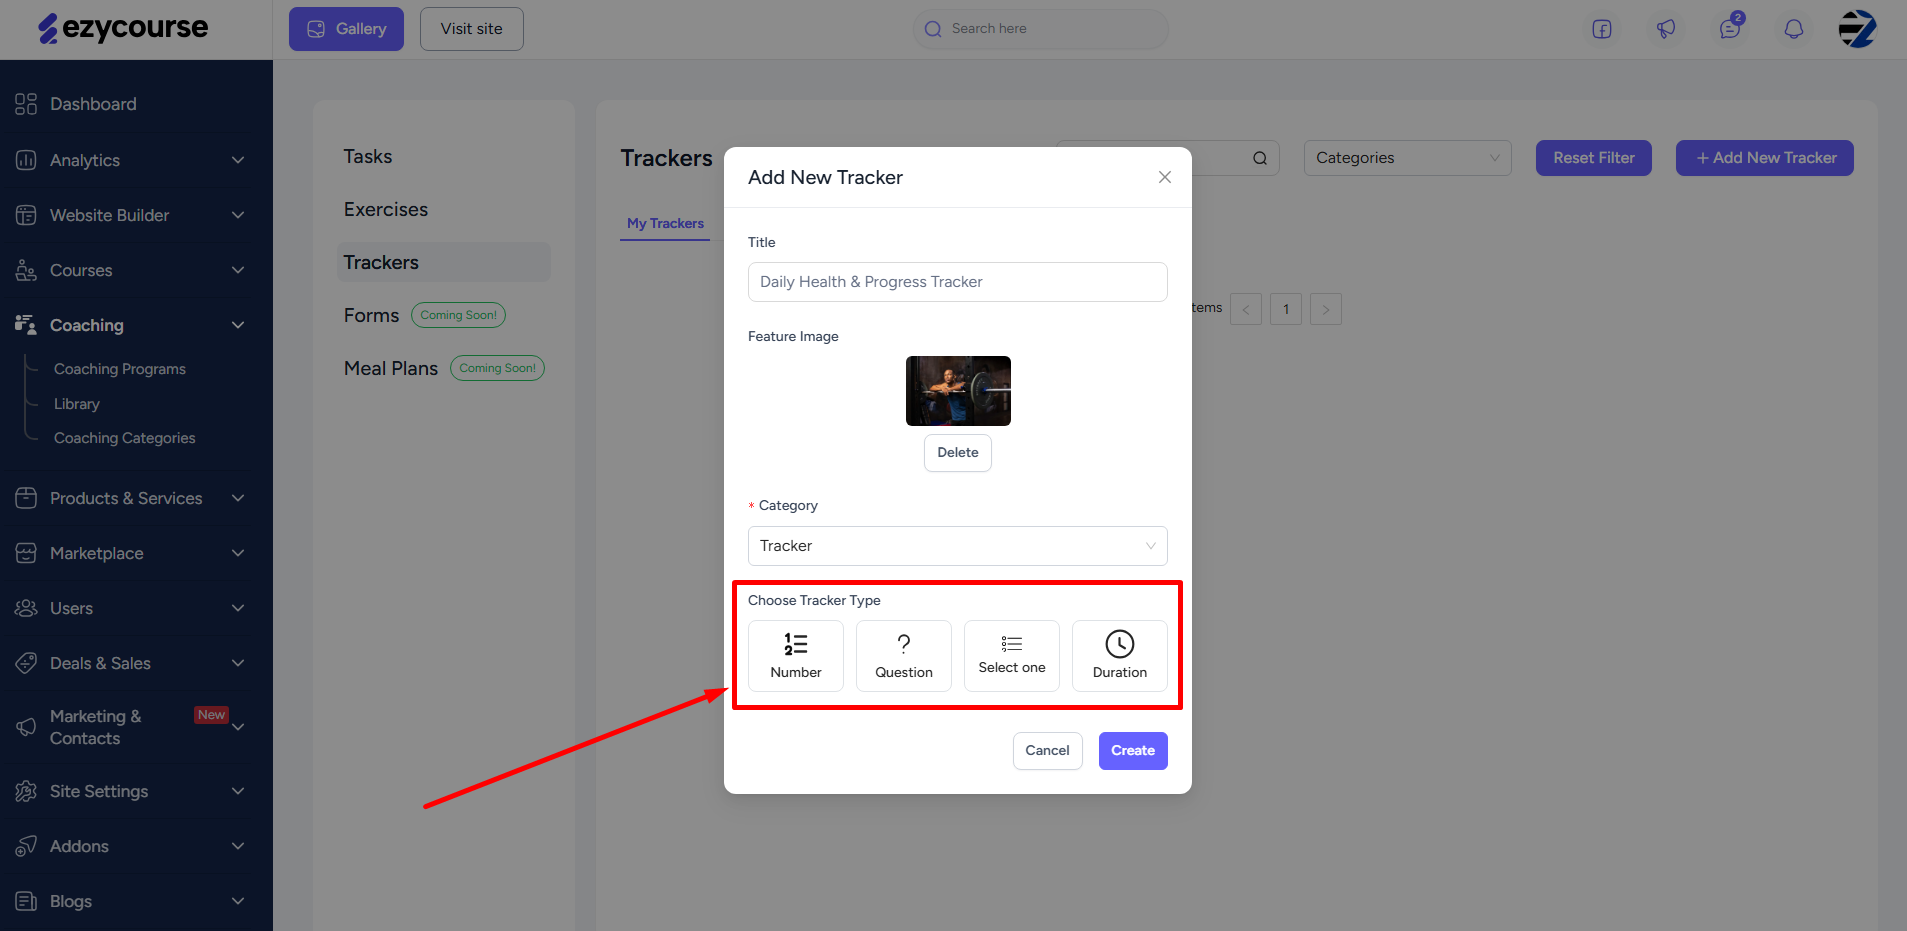
You can add multiple trackers simultaneously and even use the same type of tracker more than once. We’ve already described the four trackers and how you can use each one in the “How it works” section. Let’s briefly guide how you can add each one.
1. Number
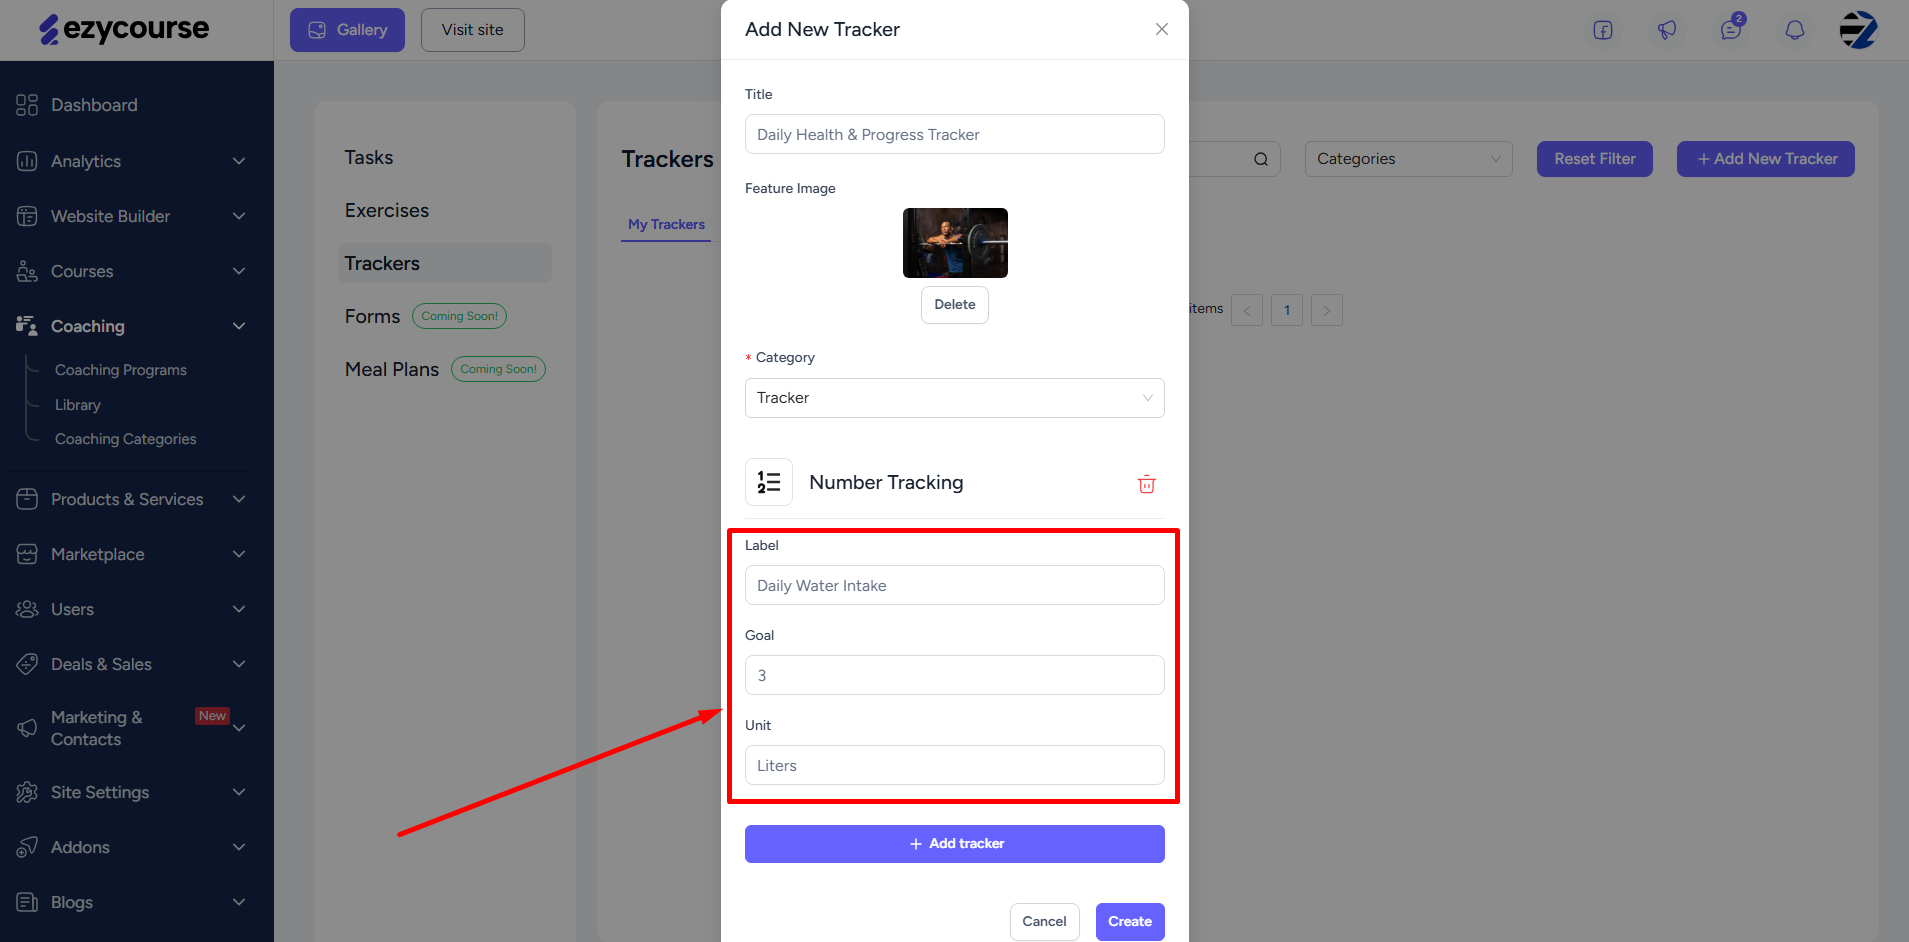
Set a goal clients need to reach and the unit represents the measurement.
Example 1
Goal: 3;
Unit: Liters;
You are asking the client to take 3 liters of water.
Example 2
Goal: 30;
Unit: minutes;
The goal is to meditate for 30 minutes.
Example 3
Goal: 10;
Unit: pages;
The goal is to read 10 pages of a book.
When you add the tracker directly in the feed or inside of a task/exercise, clients can measure and update the tracking as they are completing the tracker or doing the task/exercise.
2. Question
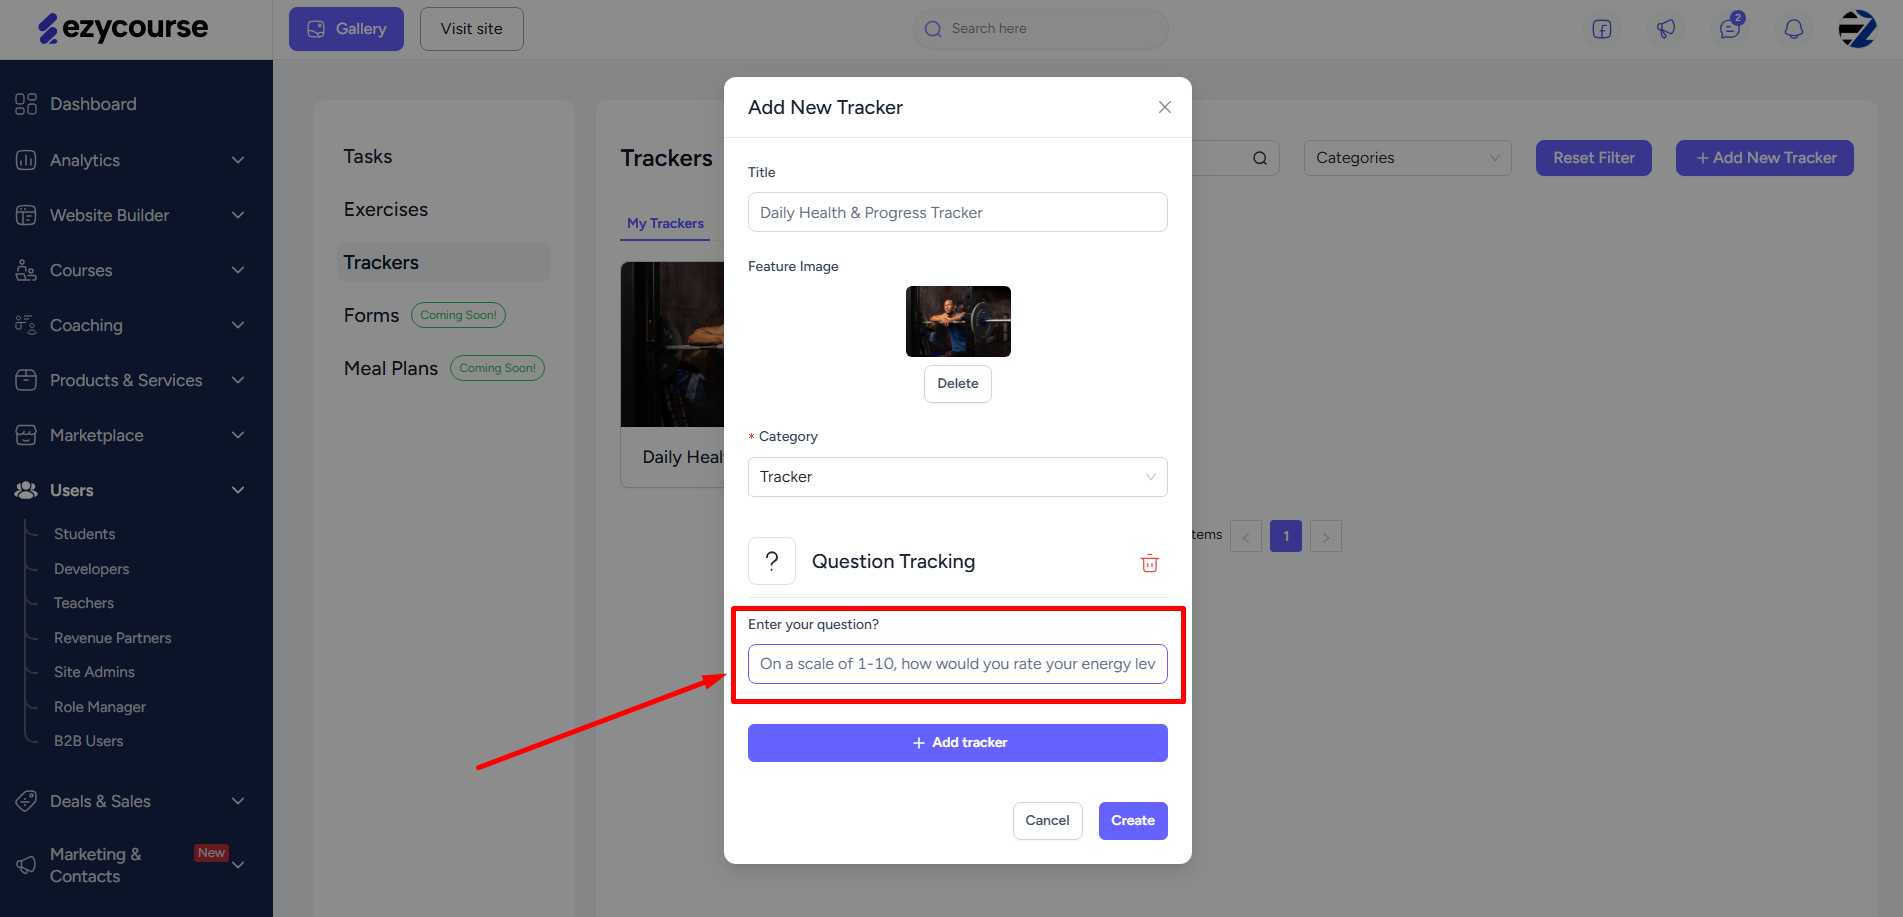
Simply add self reflection or open-ended questions. Clients can provide a free written response.

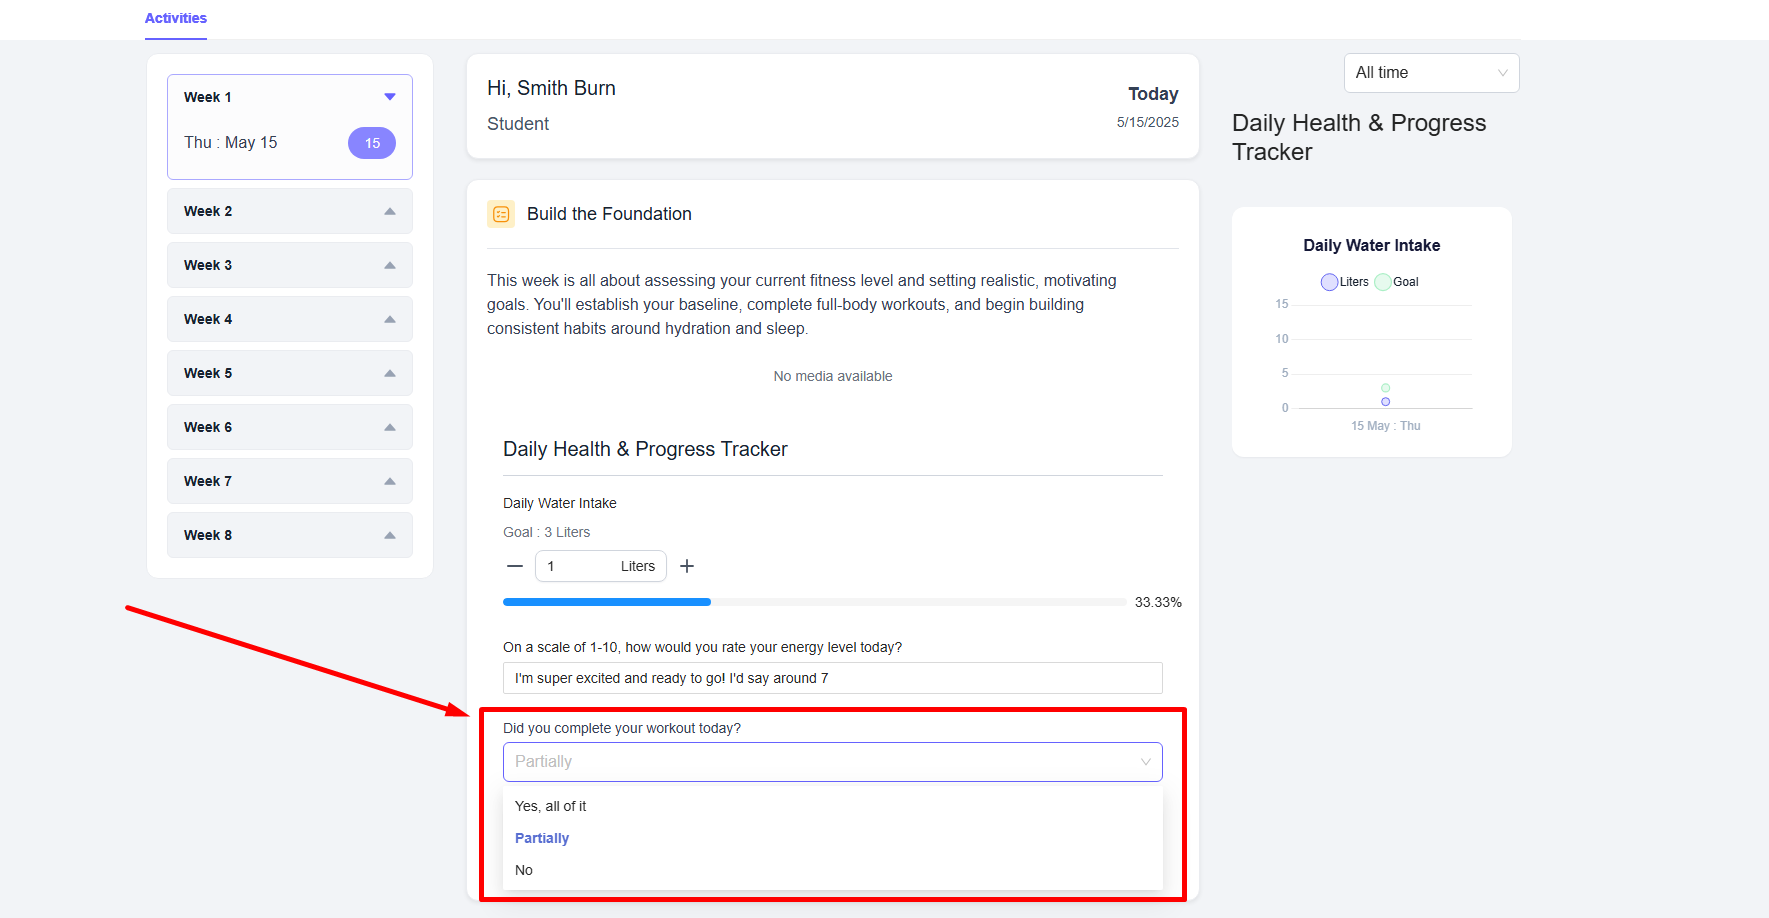
3. Select One
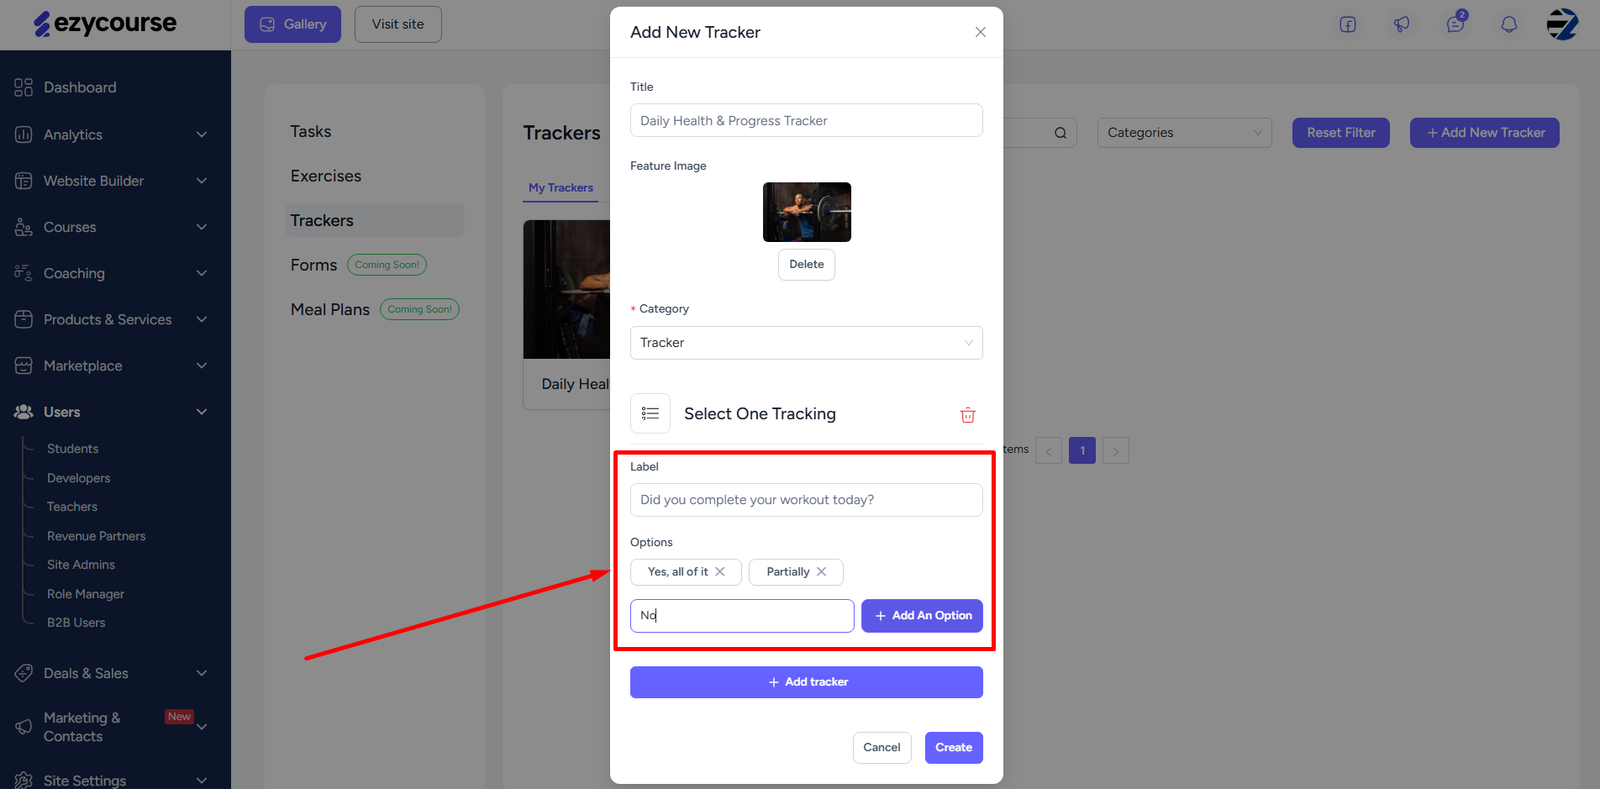
Add preset options and let clients choose from those in order to answer a question or give response to a statement. Here’s how clients view this type of trackers in the feed.
4. Duration
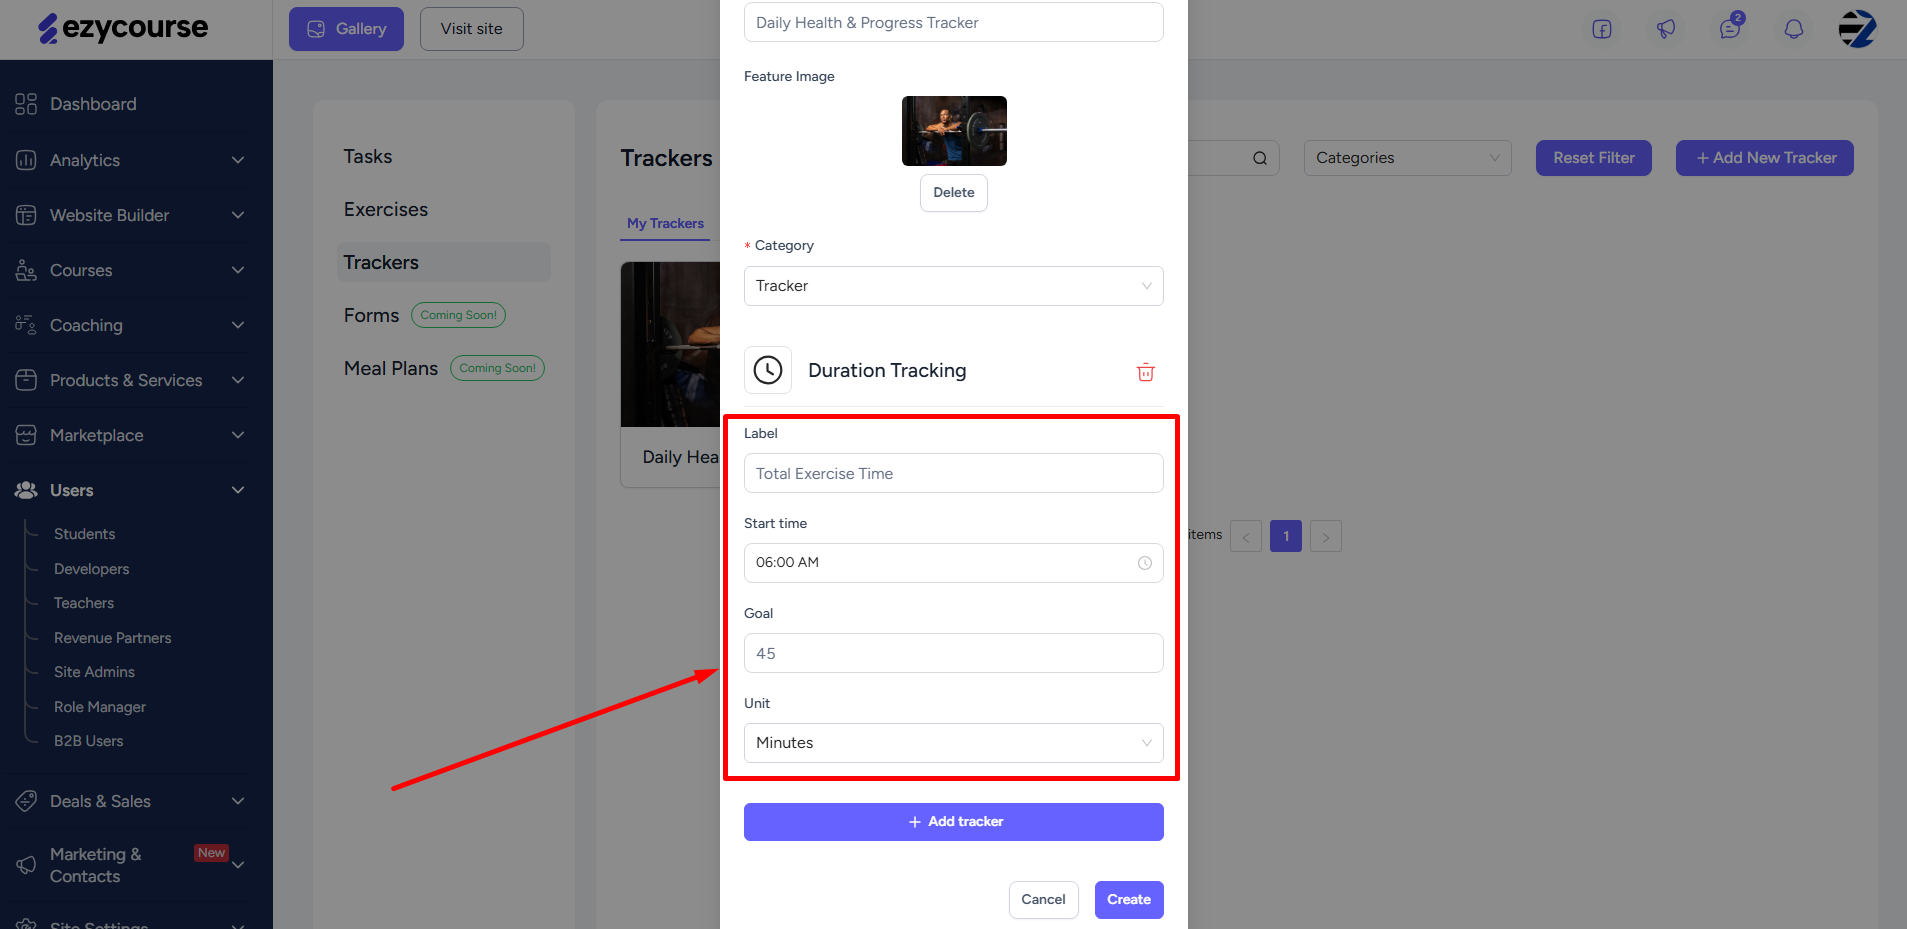
This is for tracking the time spent doing a task or an exercise. You can choose when clients begin the task, target amount of time, and the unit time in minutes or hours.
Example
Label: Meditation
Start time: 8:00 AM
Goal: 20
Unit: Minutes
Clients will be able to see when they are supposed to start the tracking, select the time they’re starting, and track the duration.

Setting Coaching Structure/Sessions
The feed is where everything comes to life. You can view the feed of any coaching program from Coaching -> Coaching Programs -> and click the Visit button.

You get a blank feed at first. From the left side panel, you’ll have to set up the coaching structure. It depends on the coaching type whether it’s weeks, sessions, or batches. We’ll discuss three separate coaching types. Read how to set up the Evergreen program here.
Week Based
On the left side panel, you’ll see the Add New Week(s) button. Click it.

On the popup, you’ll have to select the start and end dates of the program. You can choose the exact days of the week when the sessions will take place.

The other option you’ll be able to choose is the “starting day of the week“. Depending on this, the program will start.

Suppose, you select the following settings:
Start Date: 13/01/2026 (Tuesday)
End Date: 27/01/2026 (Tuesday)
Week Days: Sunday | Tuesday | Thursday
Starting Day: Sunday
Even though the starting date falls on a Tuesday, the program will actually begin next Sunday; and not on Tuesday or Thursday. This is because the “Starting Day” is chosen to be Sunday.
You can preview the date and day of every week within the program.


Continuous
We have this session type if you want to run a batch wise coaching program. Setting up is very similar to the week based program. You can choose the week days and the starting day of the week.
Furthermore, you can select the start and end date of the program which ultimately helps to determine how long a batch will run.

You cannot run multiple batches simultaneously. Once a batch duration ends, a new batch automatically begins on the exact starting date.
Non-Week/Session Based
For this type, your program is simply divided into sessions, with each session having the exact number of subsessions as you predefine. Unlike week-based sessions, this type is not limited to any timeframe. And clients do not have to wait for the exact date to arrive for viewing activities. Rather they can go to any subsession and start doing the activities under that particular subsession.
So, all you have to do is provide the number of sessions, and then the number of subsessions for each session.

The total number of subsessions will be calculated for you to see.

Interacting & Adding Activities
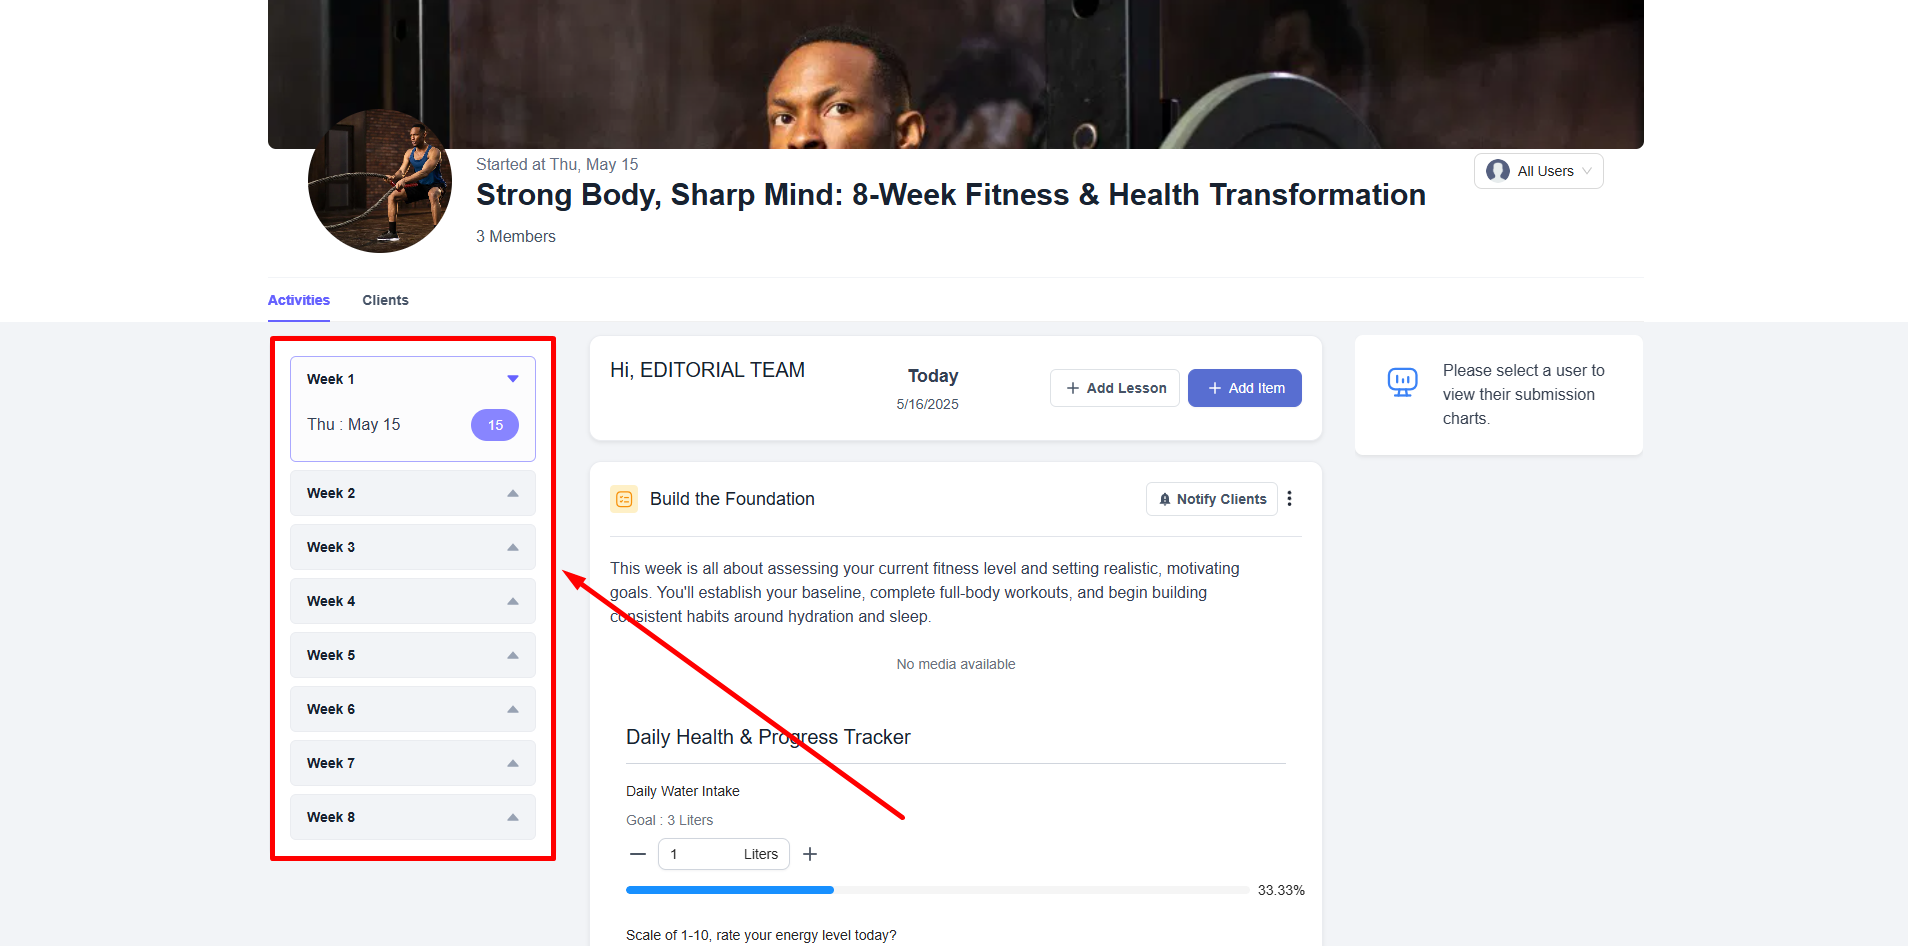
On the left side of the feed, you’ll see the complete program sessions either set up week-by-week or subsessions, depending on the type of program. You can navigate between the sessions or dates and see all the activities under any particular session. Clients will have the same feed view except the buttons for adding activities.
For non-week coaching type, you can rename the session and sub-session from the left sidebar of the feed. Just click the edit icon and rename sessions or sub-sessions. There are also more session options you can accomplish from here. Note that you can also edit or rename weeks in the week-based or continuous coaching type.

To add activities, there are two buttons. Click the Add Lesson button to add a lesson type in the feed. There are 9 types of lessons you can add.


You can either create a new lesson from scratch or simply choose any existing lesson from the library.

For assigning the lesson to client individually, click the Assign Lesson button. This lets you give 1:1 session. The Assign To All button simply sends the lesson or shows the lesson to all the clients enrolled in the coaching program.

For adding a task or exercise, click the Add Item button.

On the popup, you can select either a task or an exercise, and add it to the feed for clients to see. If trackers are added to the task/exercise, they’ll automatically be added along with the task/exercise. Note that you can go create a new task or exercise from here. Furthermore, you can add trackers directly independent of task/exercise and coaching journals too.
Similar to lessons, you can assign the task or exercise either to individual clients or the whole group that’s enrolled.

Only the clients you selected will see the activity in their feed. If you edit, delete, or receive comments, then it’s completely relevant to that client in particular. To see individually assigned activities, use the filter option to select that specific client.

Besides, you can notify your clients using the Notify Clients option on top of any lesson, task, or exercise you add to the program. Remember, you can use the notify clients option only once to notify them via email or dashboard notification. You can also assign notes for clients or yourself for quick reminders. These ensure that your clients stay in the loop and never miss any important updates.

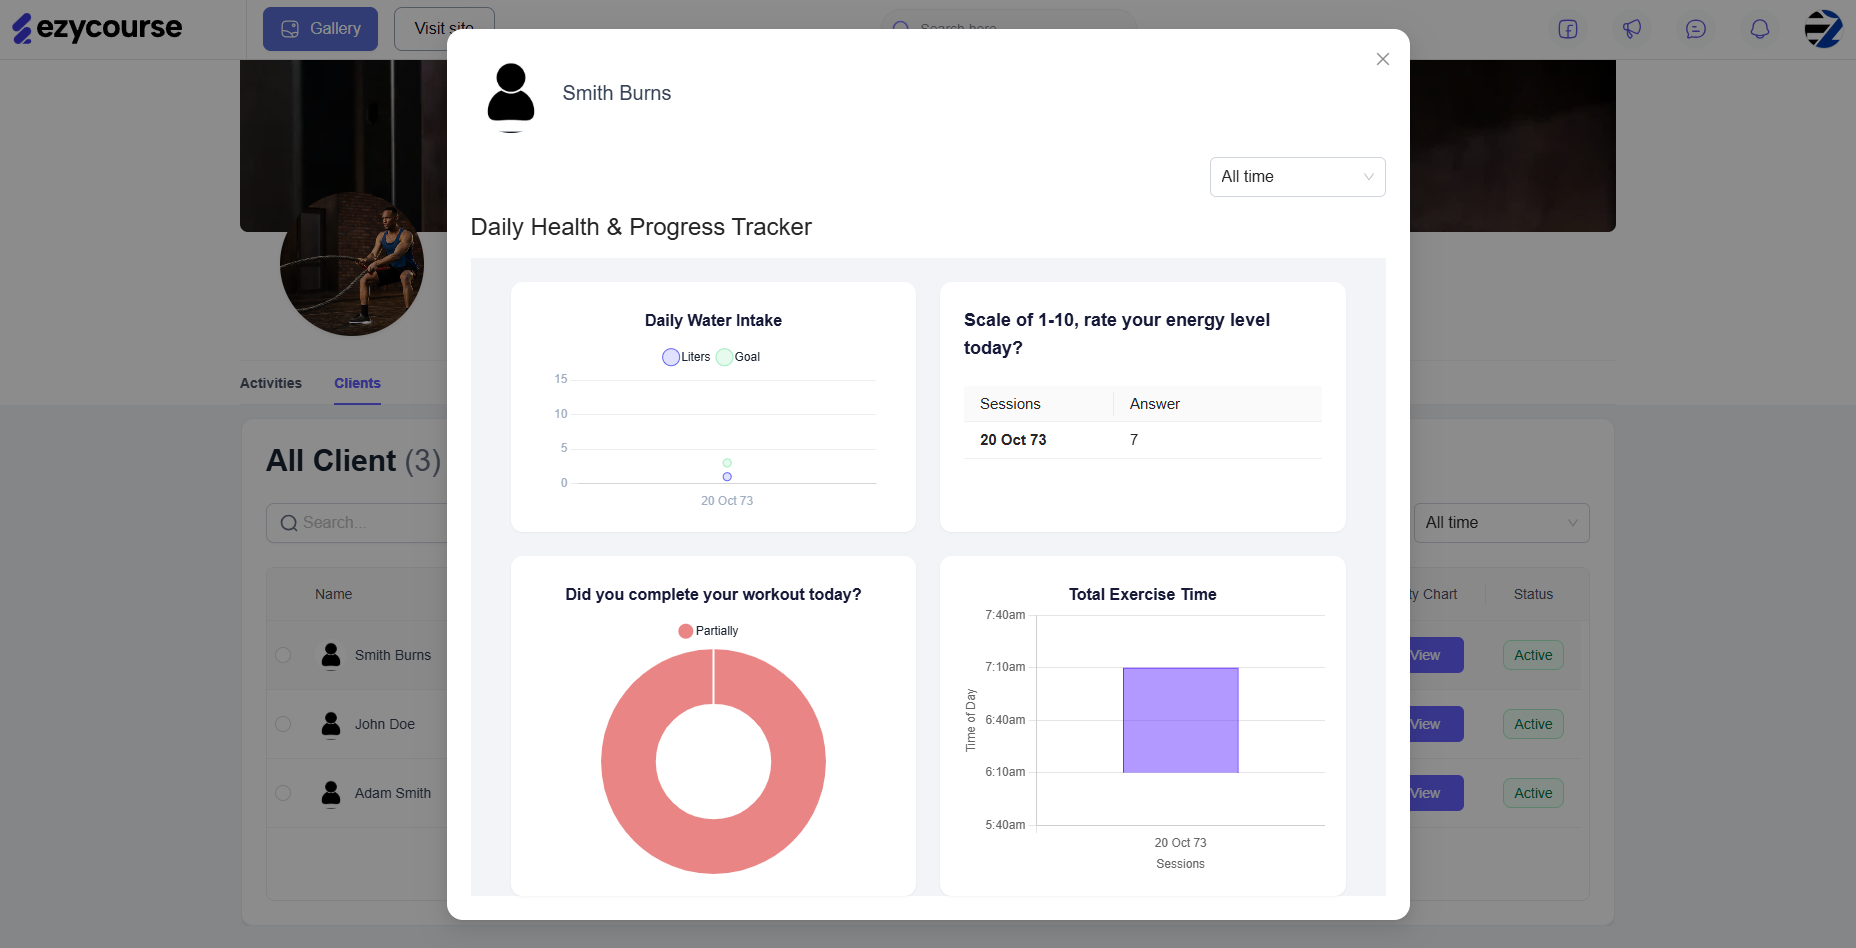
Also on the right side of the feed, the visual reports based on the response to the trackers are generated. For the four tracker types, there are four different visual reports.
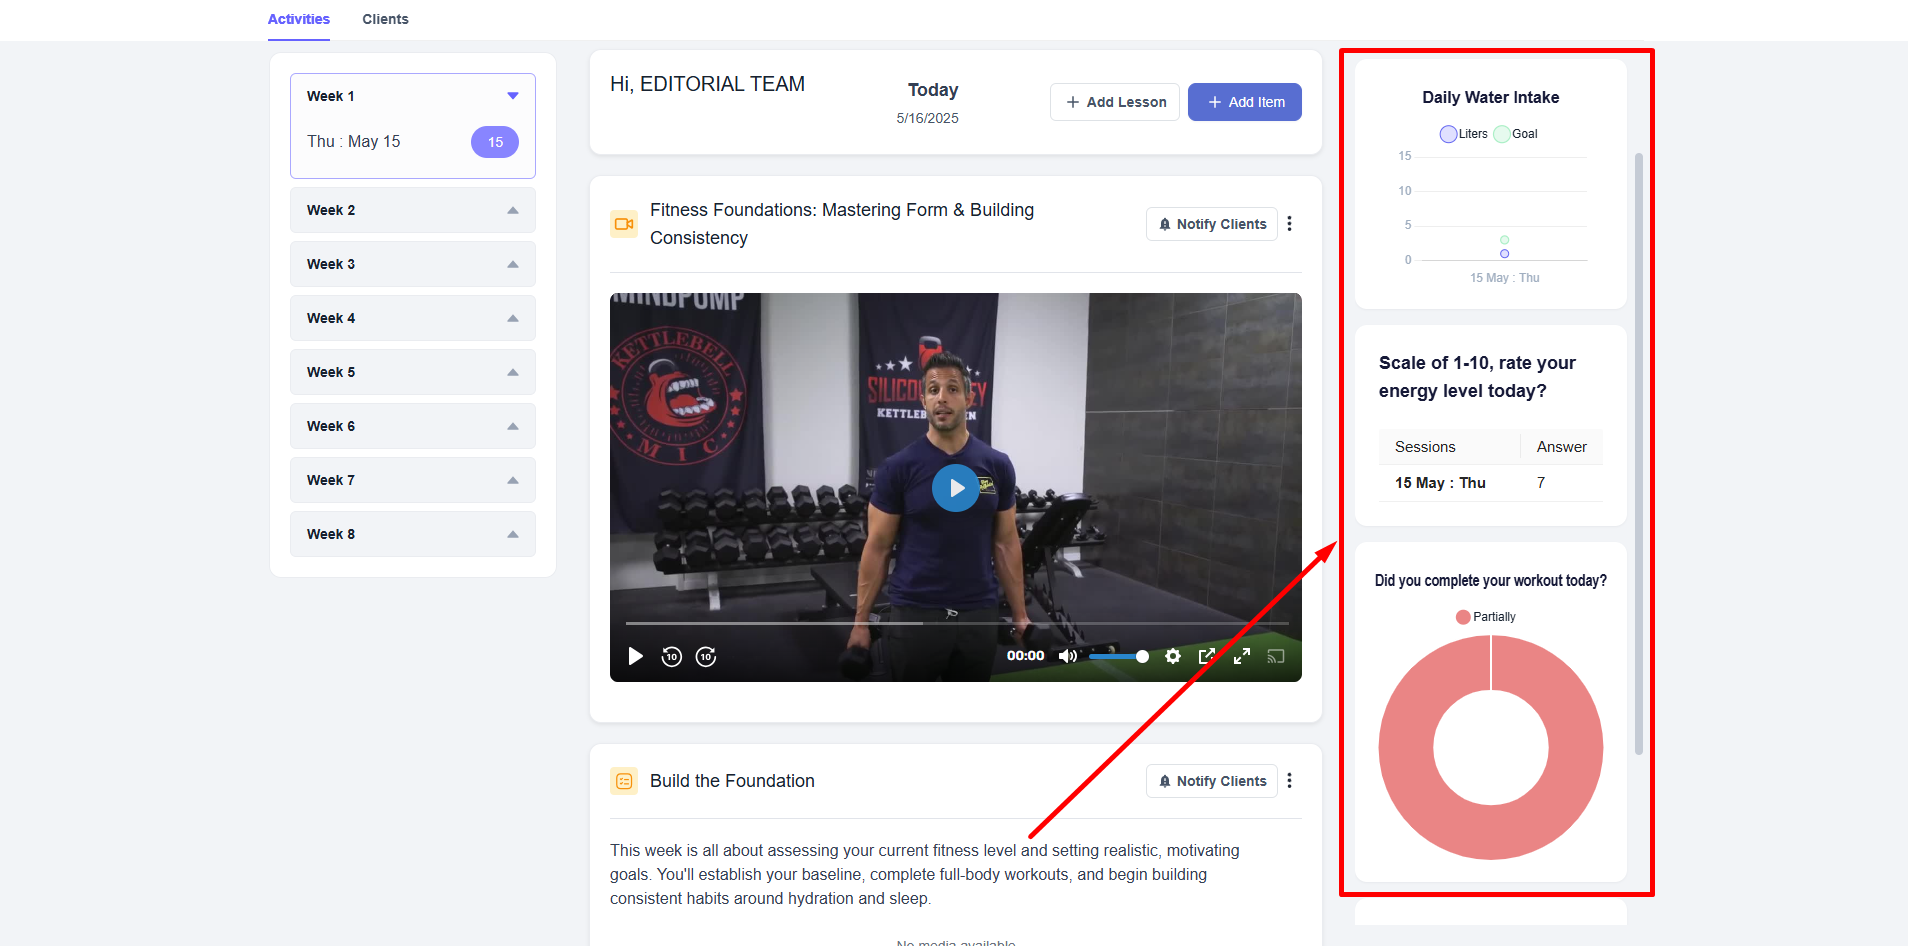
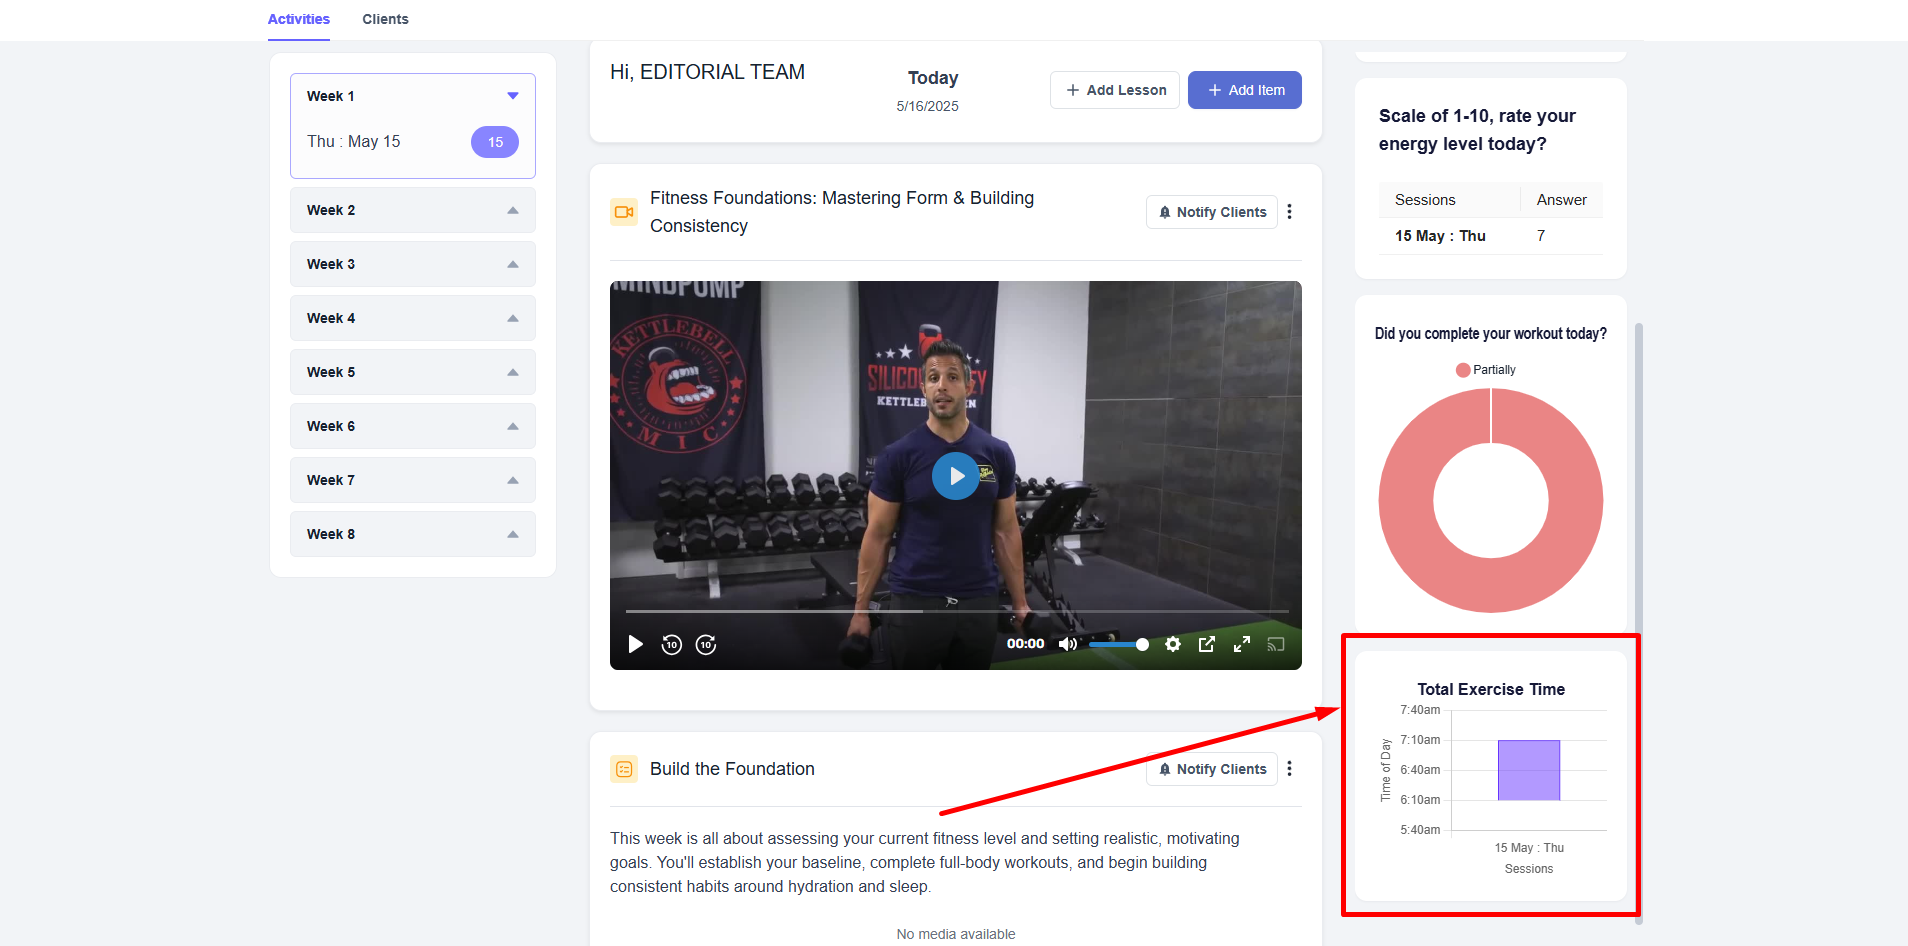
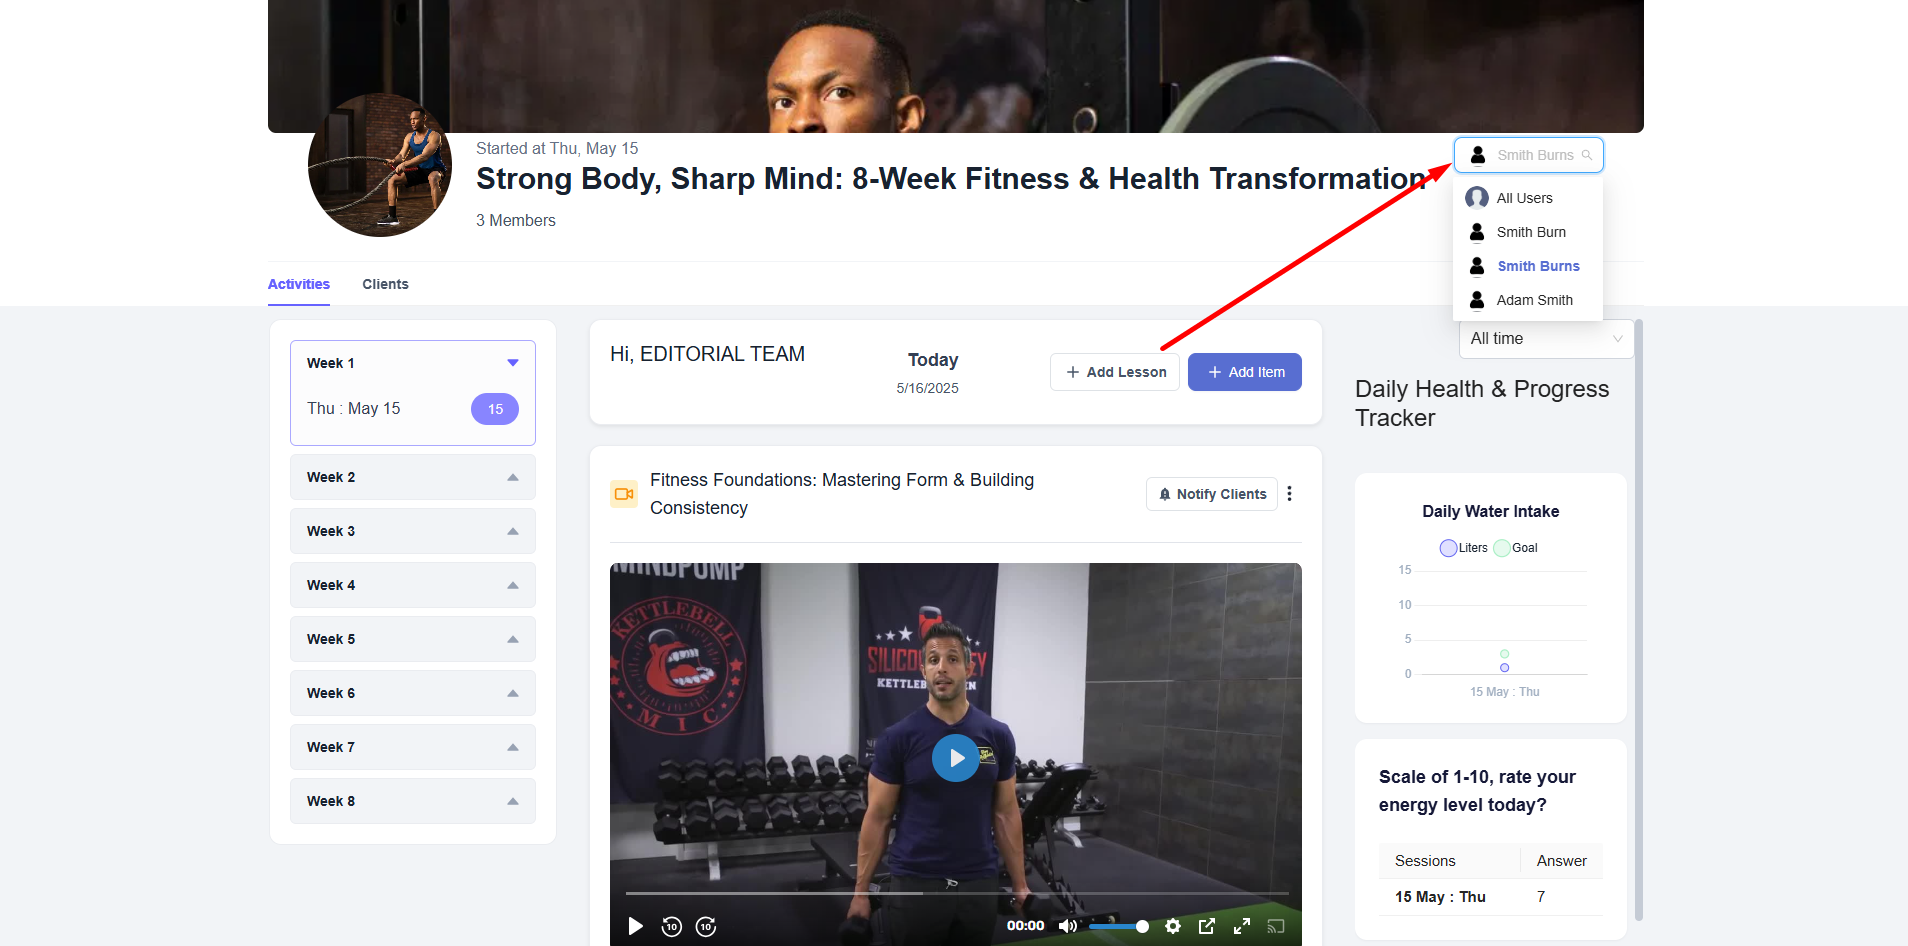
You can filter specific users to view their specific reports and performance.
You can view the task/exercise submissions from clients, including files if submitted.


Also, you can give feedback on their submissions separately. You the option to update or delete the feedback as well afterwards.

And upon receiving your submission feedback, clients will receive email notifications.
[Note: Updating the feedback won’t send any email notifications to the clients.]
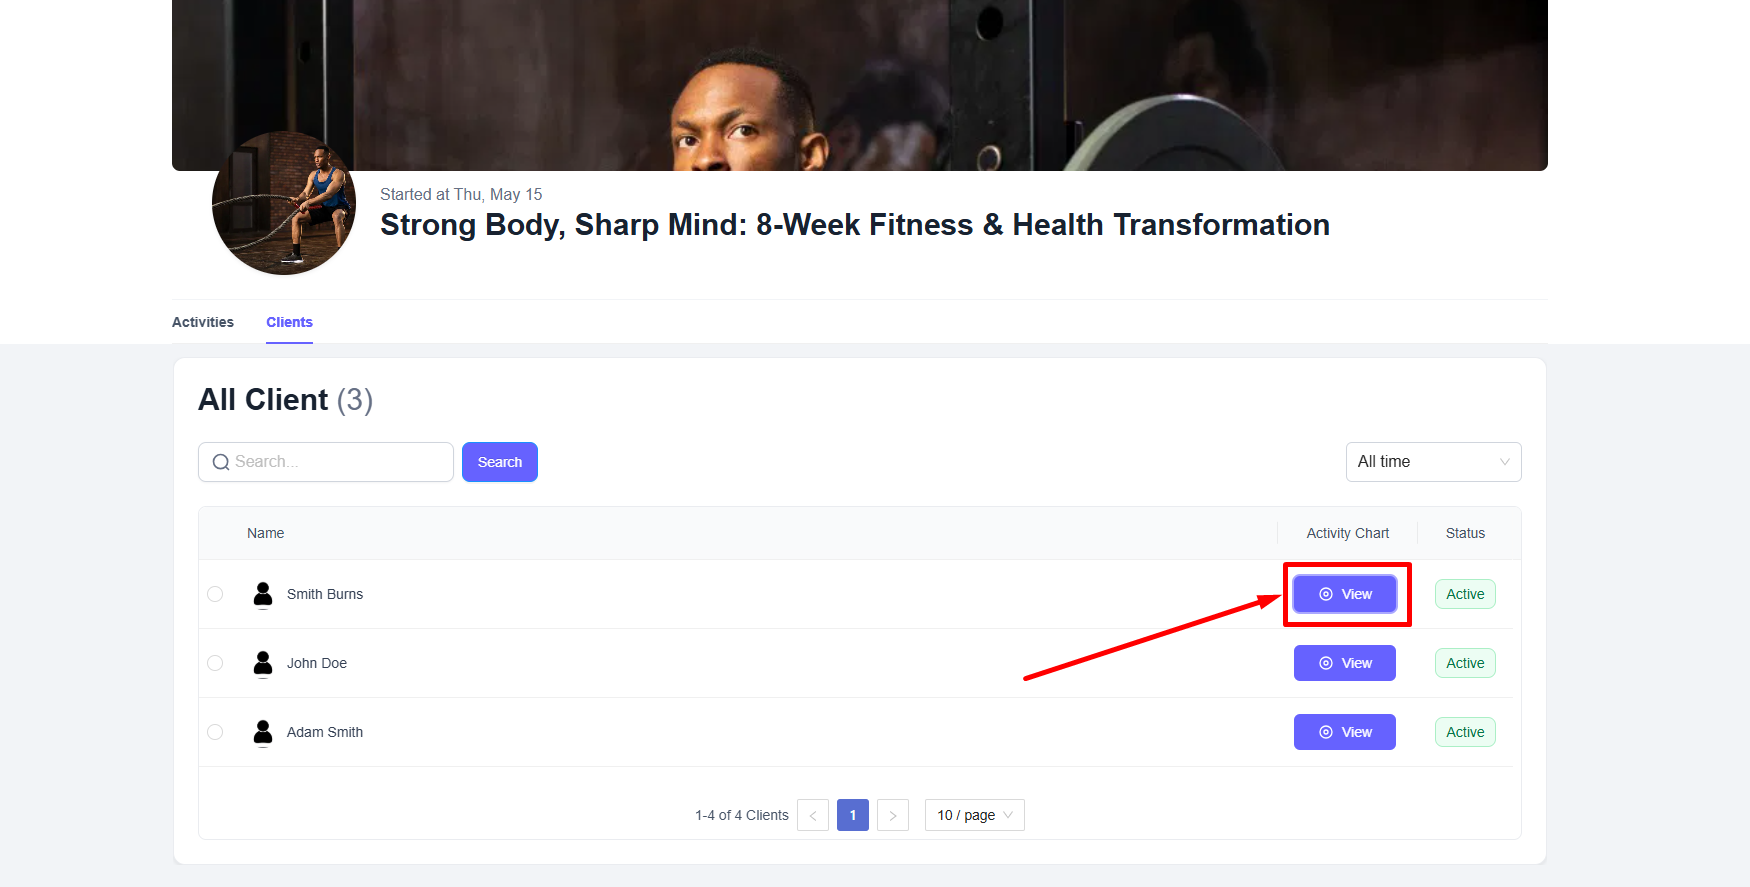
Click the Clients tab to view all the clients and their status in the program.
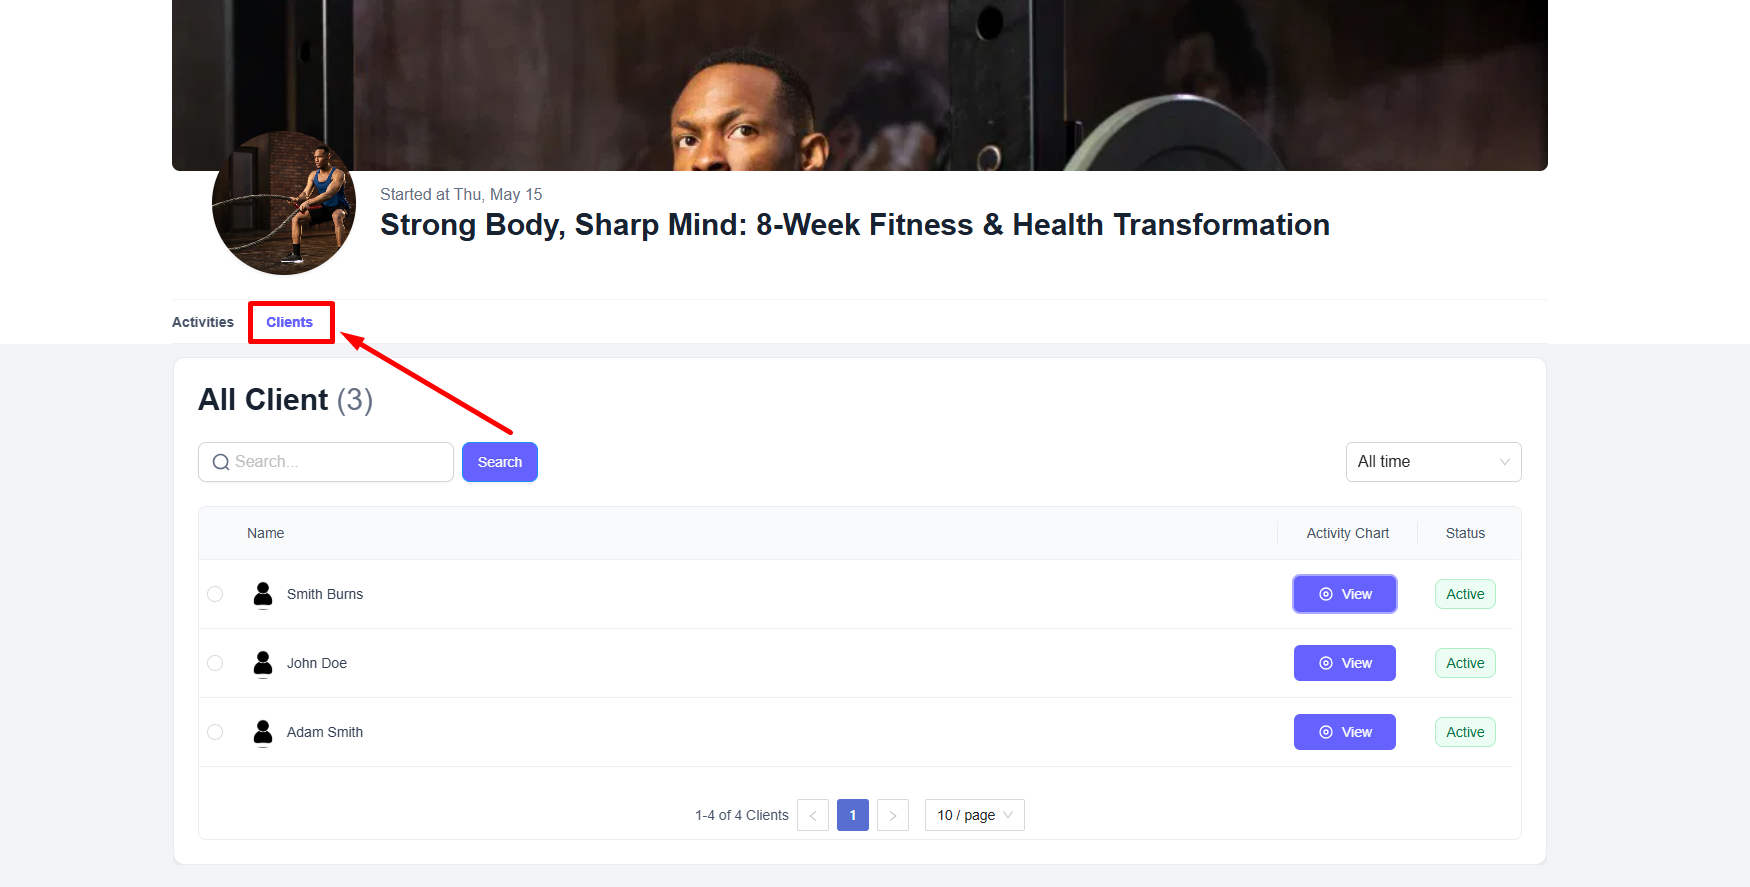
You can also view the activity chart of each client by clicking the View button.
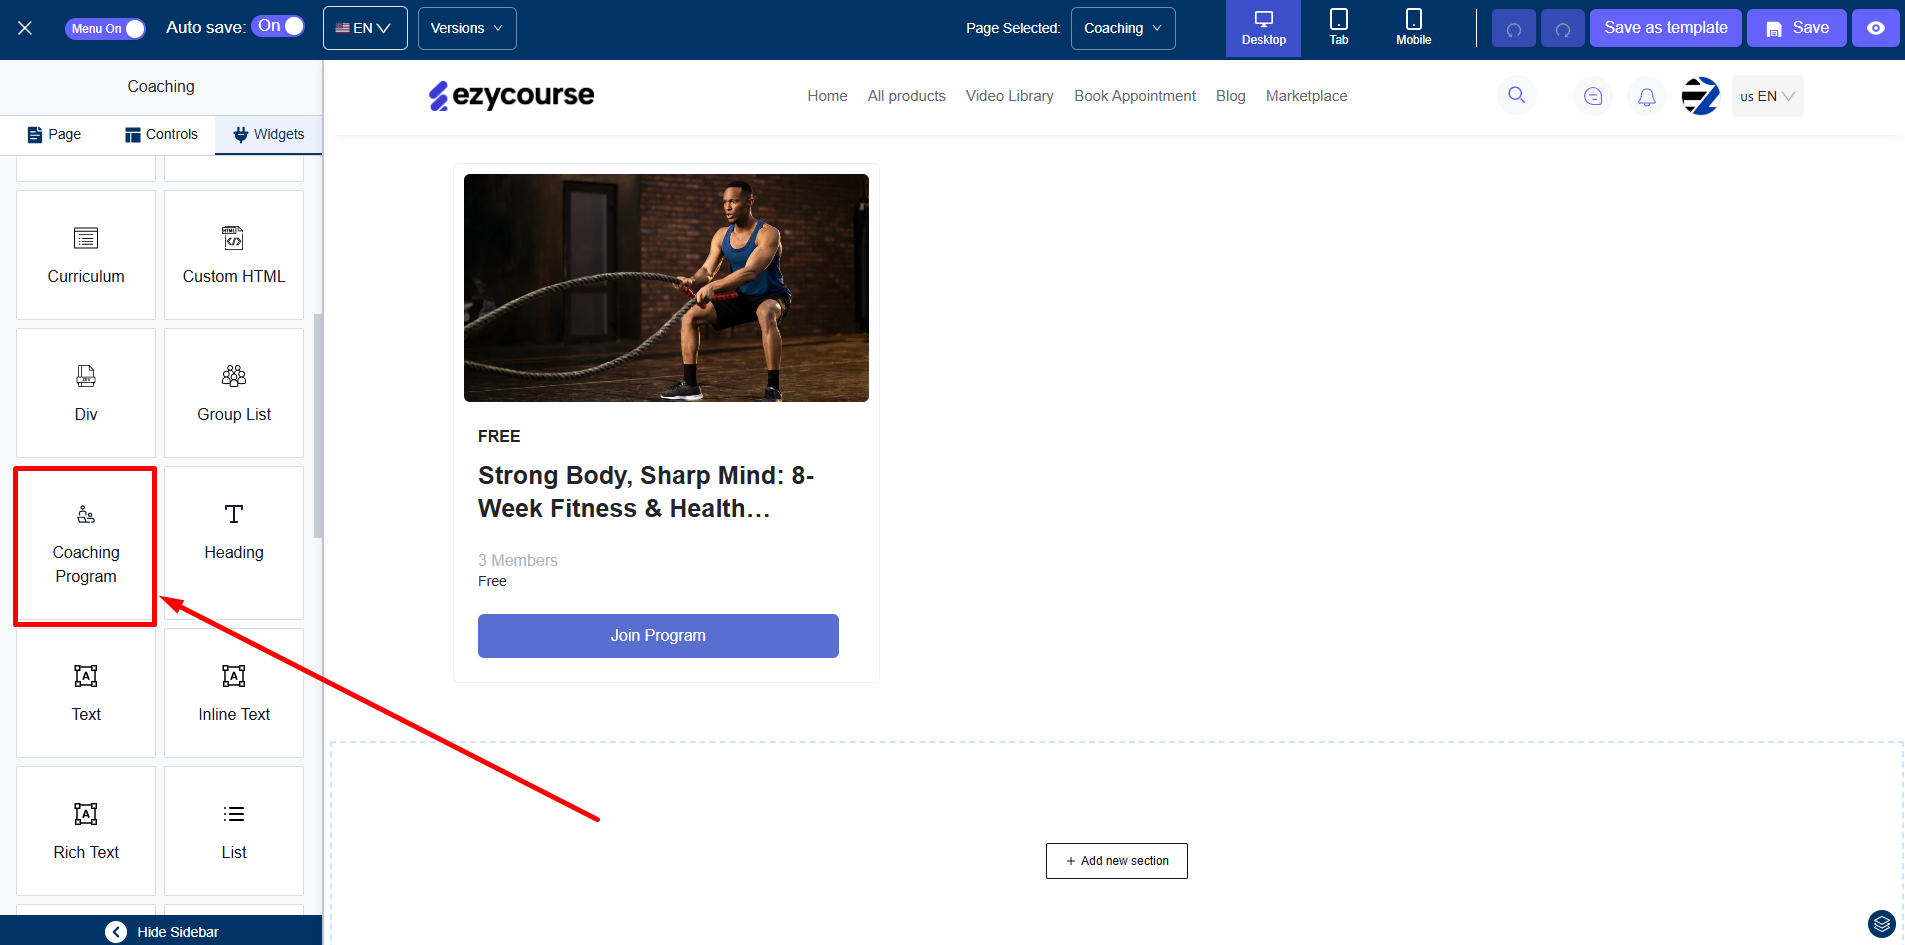
By the way, you can use the “Coaching Program“ widget inside the website builder to show all the programs on your website. Clients can purchase or join the program from your website.
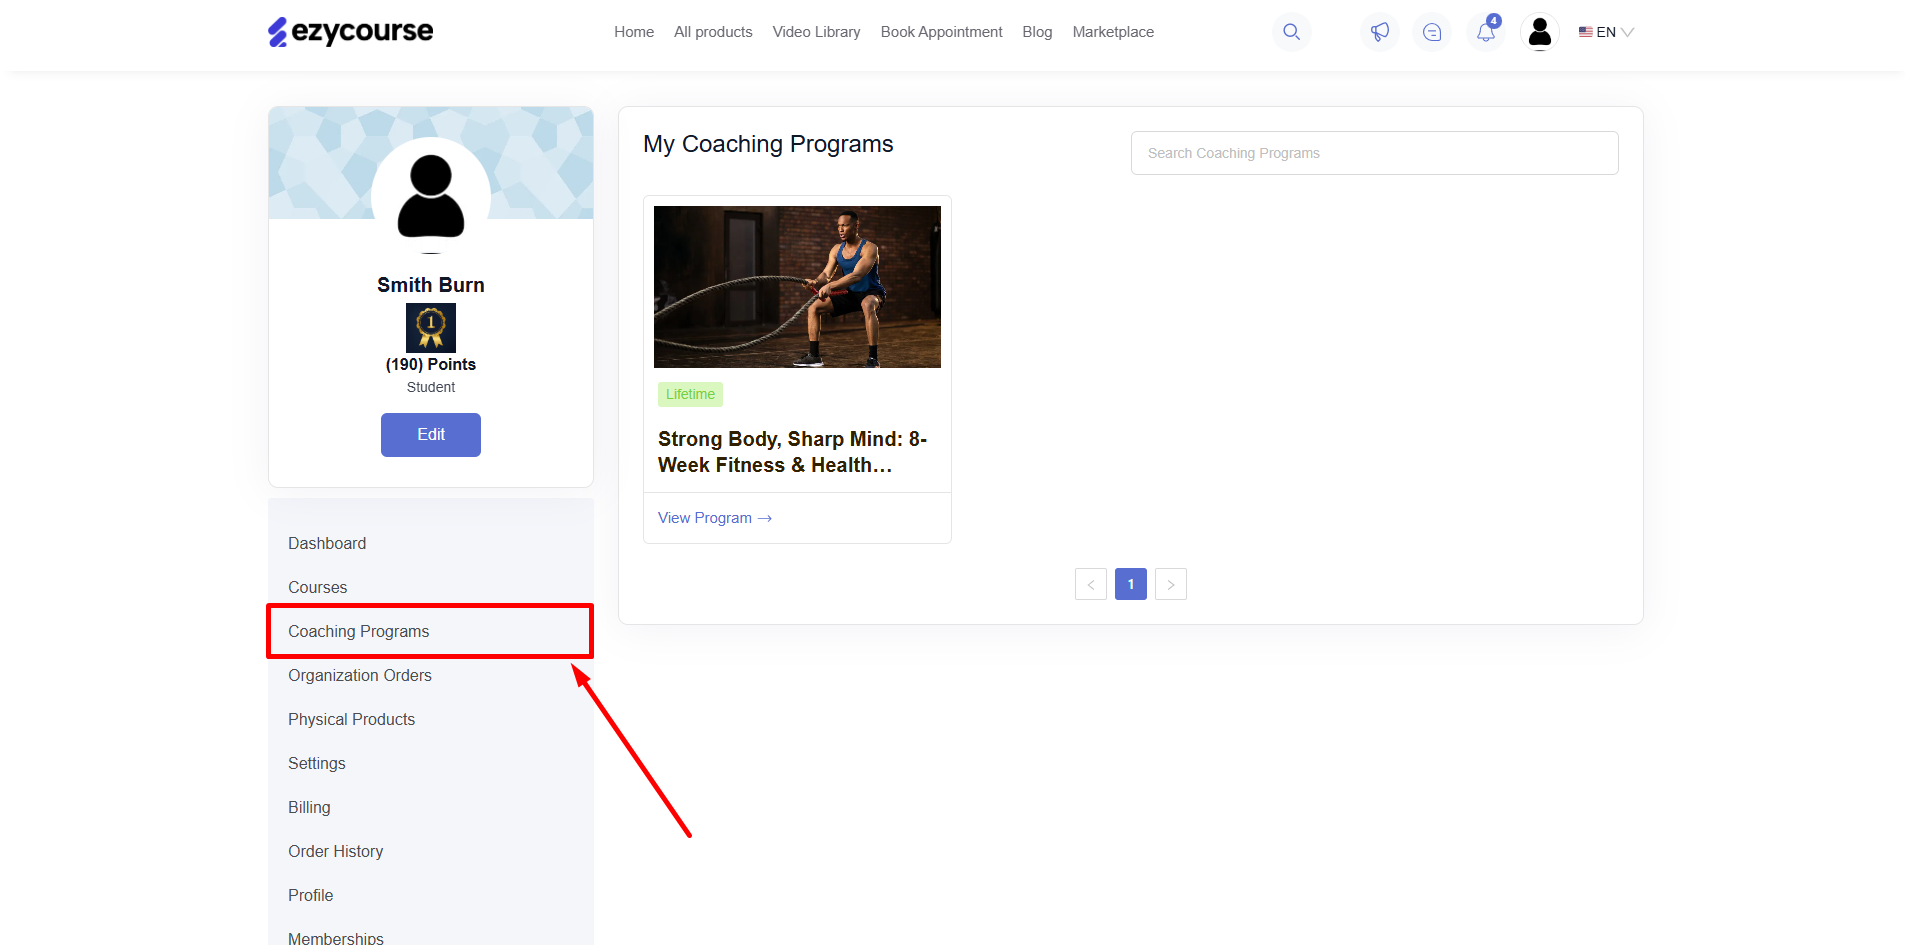
After joining, they can view the program feed from the Coaching Programs menu on their dashboard.
We are just getting started with the Coaching Program feature. There will be more features added like meal routines, forms, and much more. You’ll also find it available in the white-label mobile app very soon.