Back
Import Quiz Questions
How to Import Quiz Questions from CSV
With EzyCourse, you can easily and effortlessly import quiz questions from a CSV file. Here, you will learn how to import quiz questions into existing subjects on your platform.
A subject is basically a folder containing quiz questions. You can access existing subjects or create a new subject from Courses -> Question Bank.
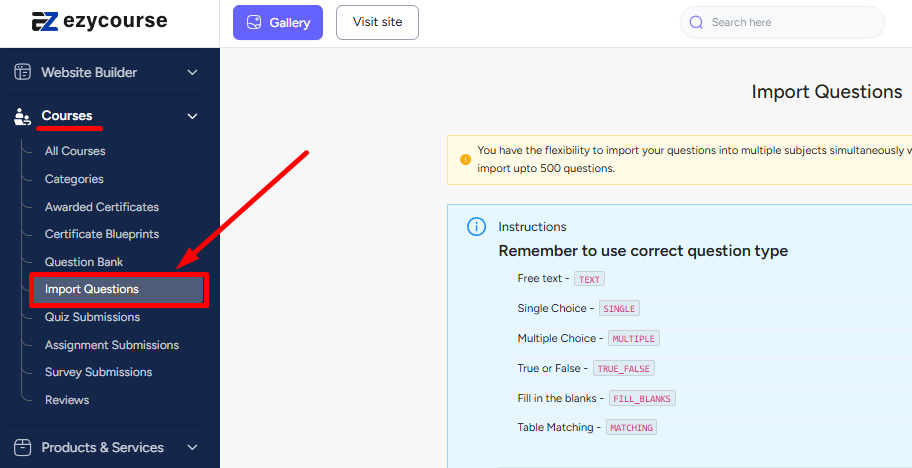
Now, to import quiz questions into an existing subject, go to Courses -> Import Questions.
[Note: You can import questions into multiple subjects at the same time. And you can import up to 500 questions max at a time.]

From here, you can scroll down and simply choose your CSV file and import the quiz questions.
How to Structure Your CSV file
For importing quiz questions, you have to structure your CSV file according to a certain format. Here, you’ll see how to structure your file and import each of the types of quiz questions.
Using a Google Sheet is the easiest way to turn your file into a CSV and then import it on your EzyCourse dashboard. So, open a new Google Sheet first.
General Columns
There are some general columns which you must have no matter which question type you are importing. These are mark, subject_id, question_type, and title.
1. mark: In this column, you have to give the score for the question. In other words, this column holds the score or points that the student will get for correctly answering the question.
2. subject_id: The subject_id identifies which subject the question should be imported into. To find the subject_id, go to Quizzes -> Question bank. The number on the subject is the subject_id of that specific subject.
3. question_type: EzyCourse supports six types of quiz questions. And you define which type a question is, in this column. The type may be TEXT, TRUE_FALSE, FILL_BLANKS, SINGLE, MULTIPLE, and MATCHING.
4. title: The title column holds the question which your students will see. You will know more about how to set the title column for ‘fill in the blanks’ and ‘matching’ question types below.
Here’s how your four general columns should look like.
[Note: A single row represents one question.]
Single/Multiple Question Columns
You have to add more columns which are specific to the Single and Multiple question types. Basically, these are for adding the options which you see in these question types.
To define the options, you can add choice1, choice2, choice3, choice4, and so on.
[Note: You can define no more than 10 different options. In other words, you may have columns up to choice10.]
To mark the correct answer/answers, simply add an asterisk (*) mark in front of the option.
Fill in the Blanks Question Columns
In the title column, you can write the ‘Fill in the Blanks’ question. EzyCourse lets you add blanks and dropdown options for this question type. For blanks or gaps in the question, use “[**]” when writing the question in the title column.
To indicate a dropdown, you can use use third brackets with each option separated by a vertical column (|). For example, [option1 | option2 | option3].
You need to add a column answer which is specific for the Fill in the Blanks and True/False question types. This column basically contains the answer to the Fill in the Blanks question. For each answer (blank & dropdown), add each answer inside third brackets sequentially with each one separated by comma.
For multiple correct answers for a single blank, you can write the answers inside third brackets with each one separated by a vertical bar (ex: [answer1 | answer2 | answer3]).
True/False Question Columns
For the true/false question type, you have to use the answer column also. The value of this column can either be TRUE representing true, or FALSE representing false.
Matching Question Columns
You need to add one more column specific for Matching questions. The column name should be table_name. You can define the names of the two tables in this column with each one separated by comma (ex: table1, table2 ).
Define the values for each of the table rows in the title column. For each row, write the values for both tables inside square brackets with each one separated by double vertical bars (||). Ex: [table1_row1 || table2_row1] [table1_row2 || table2_row2] [table1_row3 || table2_row3].
Explanation Column
On EzyCourse, you can give an explanation for the correct answer. You can include an explanation for any of the question types.
To add explanations for any question type, you need another column called explanation. You can give the explanation in the explanation column or keep it empty if no explanation should be set.
[Note: There are no specific column serials. You can put the columns in any order you like.]
Export the Sheet File into CSV
Here’s a final view at how our file looks at the end of it all.
Now, to export the file as a CSV, go to File -> Download -> and click on Comma Separated Values (.csv). Save the file as a CSV on your device.
And then you can upload the CSV file and import the questions easily from your EzyCourse dashboard.
After importing, you can double check by entering the subject/subjects from Quizzes -> Question bank menu.