
Back
Student Import: More Products, Memberships, Expiry Date, & Tags
What problem it solves or why you need it
With EzyCourse, you had the flexibility of enrolling students to your Courses and Communities from a CSV file, in just a few clicks. You could bulk enroll students to multiple Courses/Communities at the same time.
Now, we are happy to improve the on-boarding process for you with additions of new products to enroll your existing students into. In addition, you can also define the product expiry date for each of the products you are enrolling the students.
And you can even assign tags to your students now as you are importing students from a CSV file. Assigning tags will help to launch a more targeted and personalize your email campaigns.
All this simply adds to the flexibility and convenience you already had in terms of importing existing students into your platform.
How does it work
As an admin, you can use the student import option from your dashboard to enroll students into your school. Now, apart from Courses and Communities, you have the luxury of importing students and enrolling them into the following products:
• Video Library
• Audio Library
• Group Chat
• Private Chat
• Memberships
In addition, you can now choose to define the expiry date for the products. You can use this, for example, to offer limited-time product access to several students at the same time.
How to get started using it
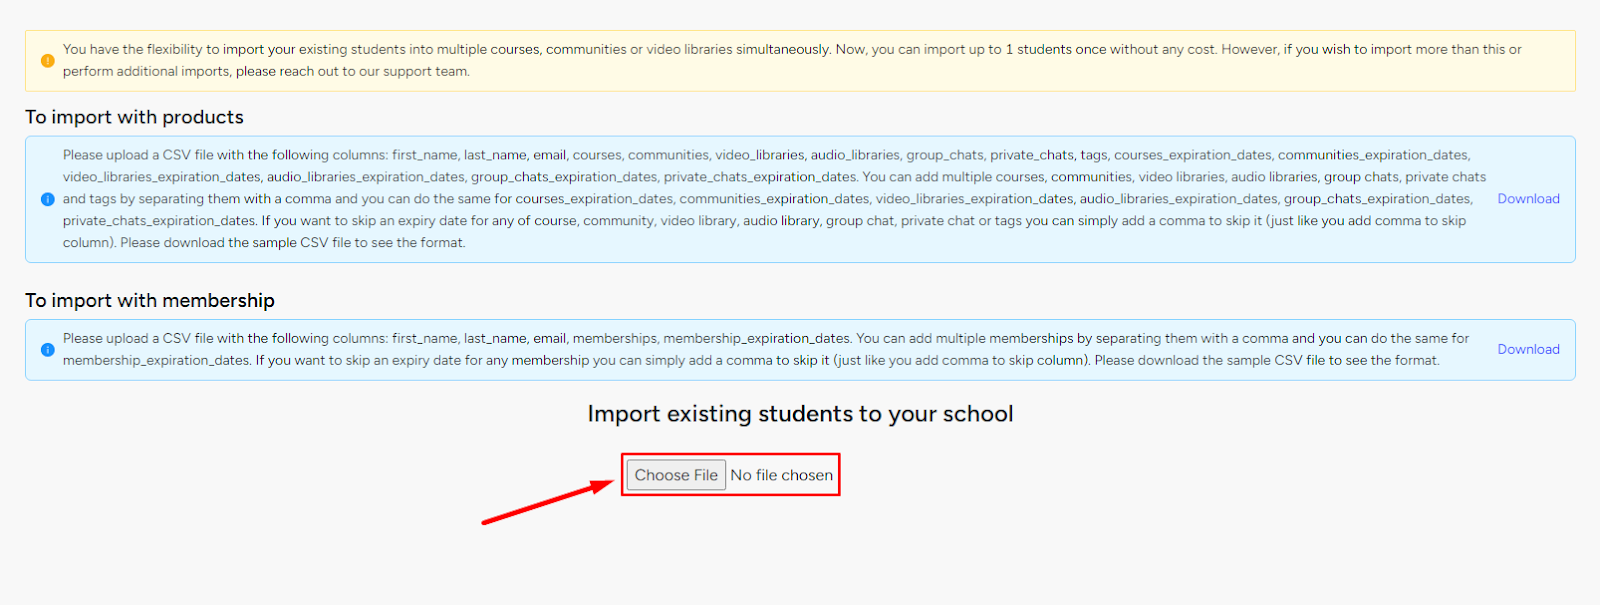
To import students, first go to your EzyCourse dashboard and head over to Users -> Students. And then click the Import students button.

Click the Choose file button and upload your CSV file.
[Note: You can use one single CSV file to import students into all the mentioned products except Memberships. For Memberships, you cannot include any other product and it has to be a separate CSV file.]
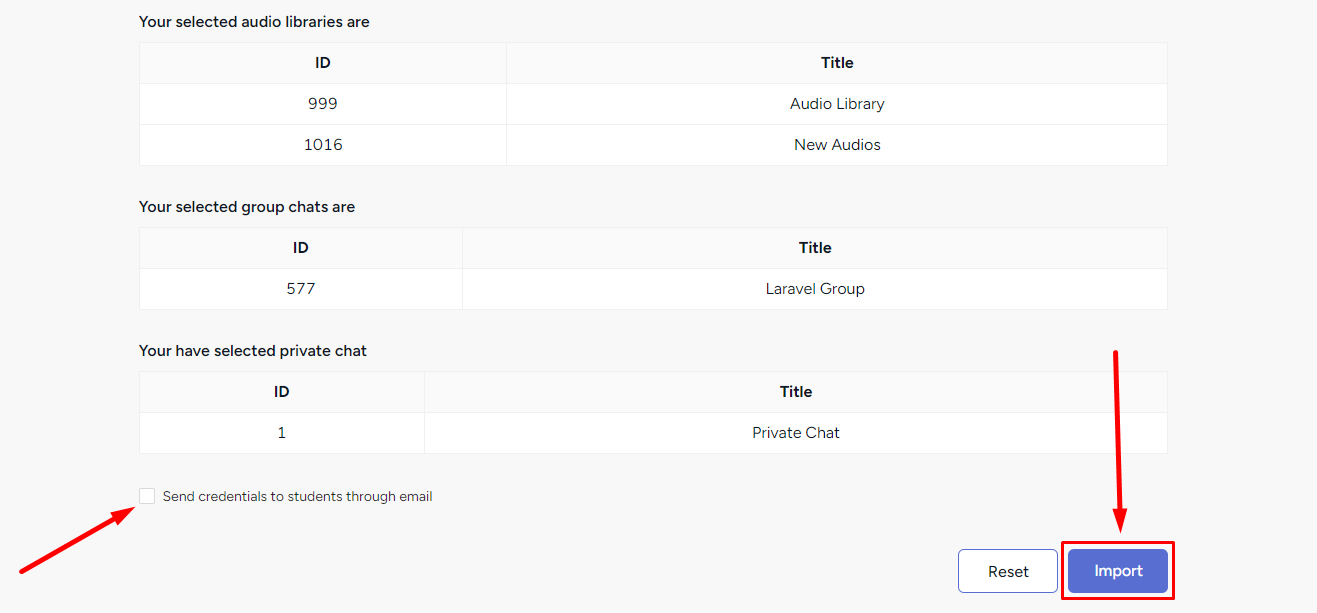
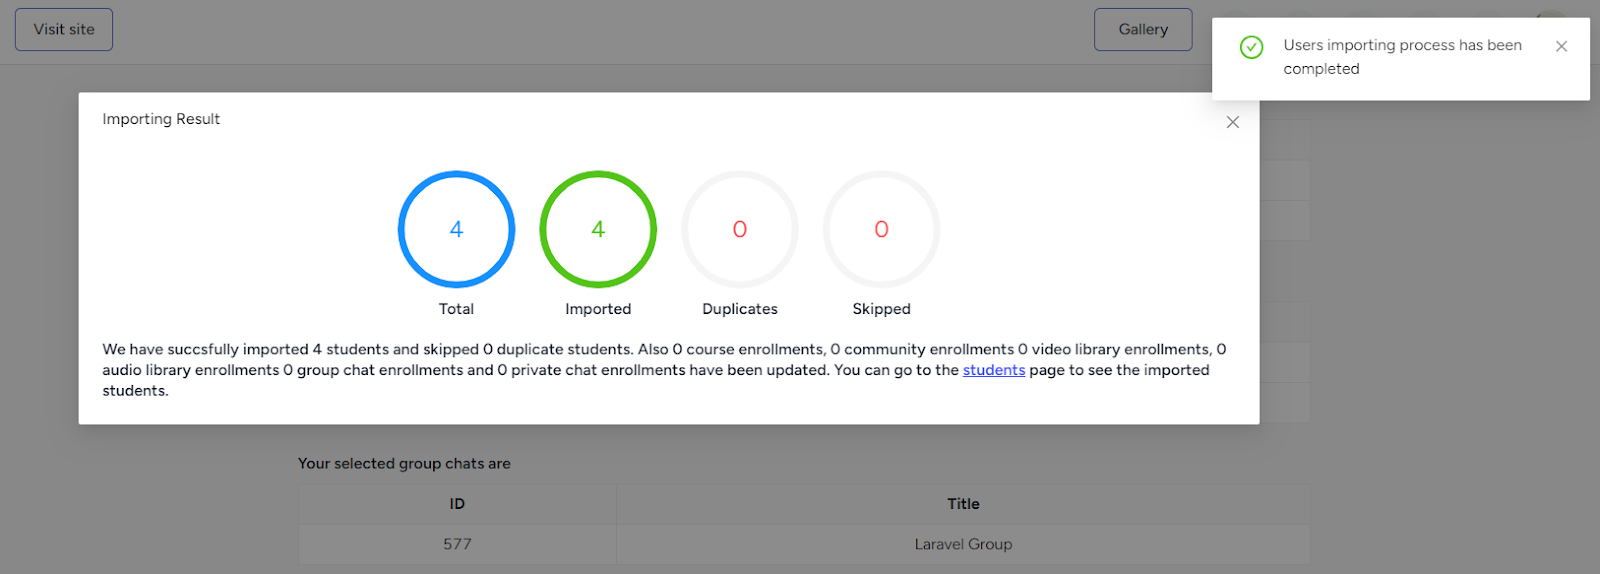
Once the file is uploaded, you will see the products which you selected. You can choose to send student credentials, including their email and password, to the students via an email. Click the Import button to start the on-boarding process and the system will automatically upload all the data.
What is copied
The following points demonstrates the settings which are copied i.e. settings that are applied to the imported students as exactly you have set on your dashboard -
• All settings of your Course or the other products including drip schedules, certificates, etc.
• Presell course settings are also copied, if set by you.
• Draft products stay hidden from the student dashboard.
• Password protected libraries will require imported students to provide the password for access.
What is not copied
The following points demonstrates the settings which will not be applied or used on the imported students, even if you have set them -
• The price will always be set to Free.
• Accessibility options are not applicable when you are importing via CSV.
How to Structure Your CSV file
For importing students, you have to structure your CSV file according to a certain format. Here, we will walk you through about the columns you need to have and how you can set the expiry date for the products.
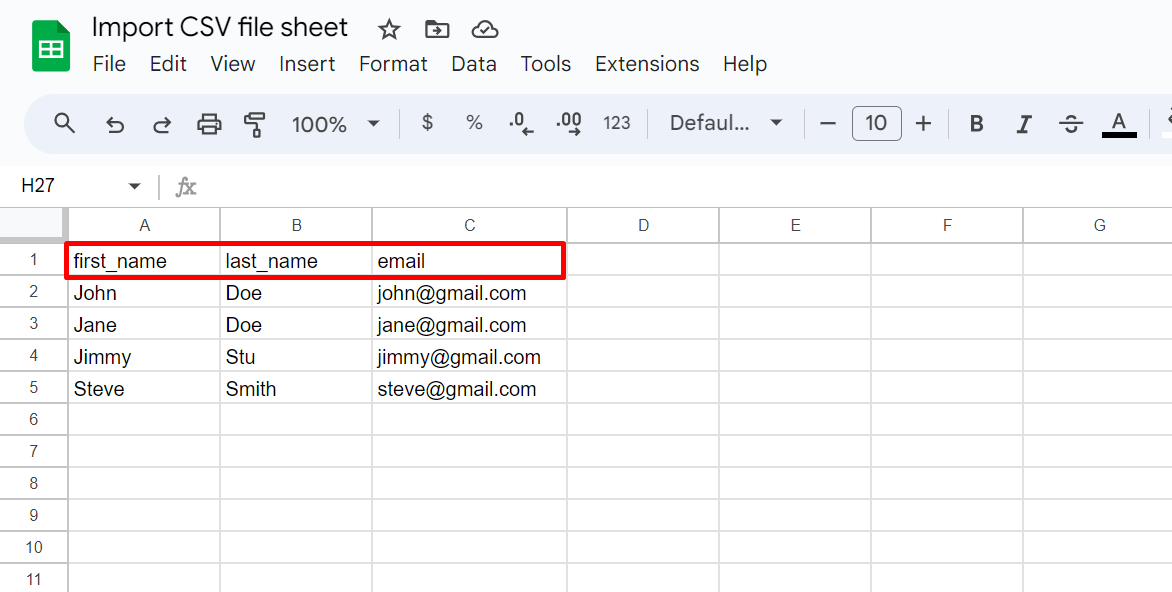
You can use a Google Sheet to create your file and then download it as a CSV. So, open a new Google Sheet file first.
[Note: To see a demo format, please download the sample CSV file from Users -> Students -> Import students. You’ll see one file for all the products and another one specific to Memberships.]
Columns for Student Identification
There are three columns you need to have in your CSV file that will identify the students who are getting imported into your system. The columns are first_name, last_name, and email. Your CSV file must have these columns.
Columns for Phone Number
You can choose to include phone numbers when importing students, if you've enabled the phone number setting for your site. The columns are: phone_number, phone_country_code, and is_number_verified. Depending on the settings, you need to follow these points:

• No need to include these columns if phone number setting is disabled.
• The phone_number field should have the phone number with the number code. Ensure the number is within double quotations. For example, “+442071234567” where the number code is “+44“.
• If ‘isRequired’ is not set, you can leave the column cells empty if phone number is not available for any student.
• If ‘isRequired’ is set, then you must give phone_number along with phone_country_code. Note that phone_country_code will have the letter code and not number code.
• is_number_verified is only needed when the ‘Require phone number verification‘ option is enabled from setting. Value for this column could be 0 or 1, where 1 means verified and 0 means not verified.
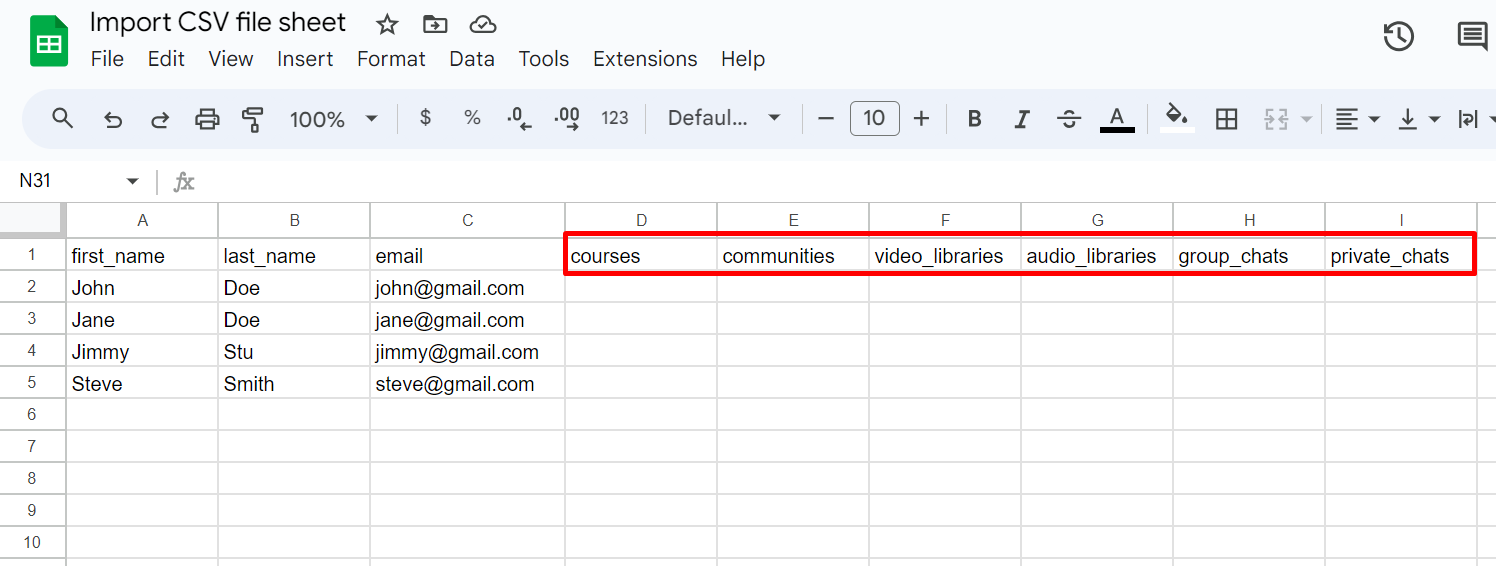
Columns for Product Identification
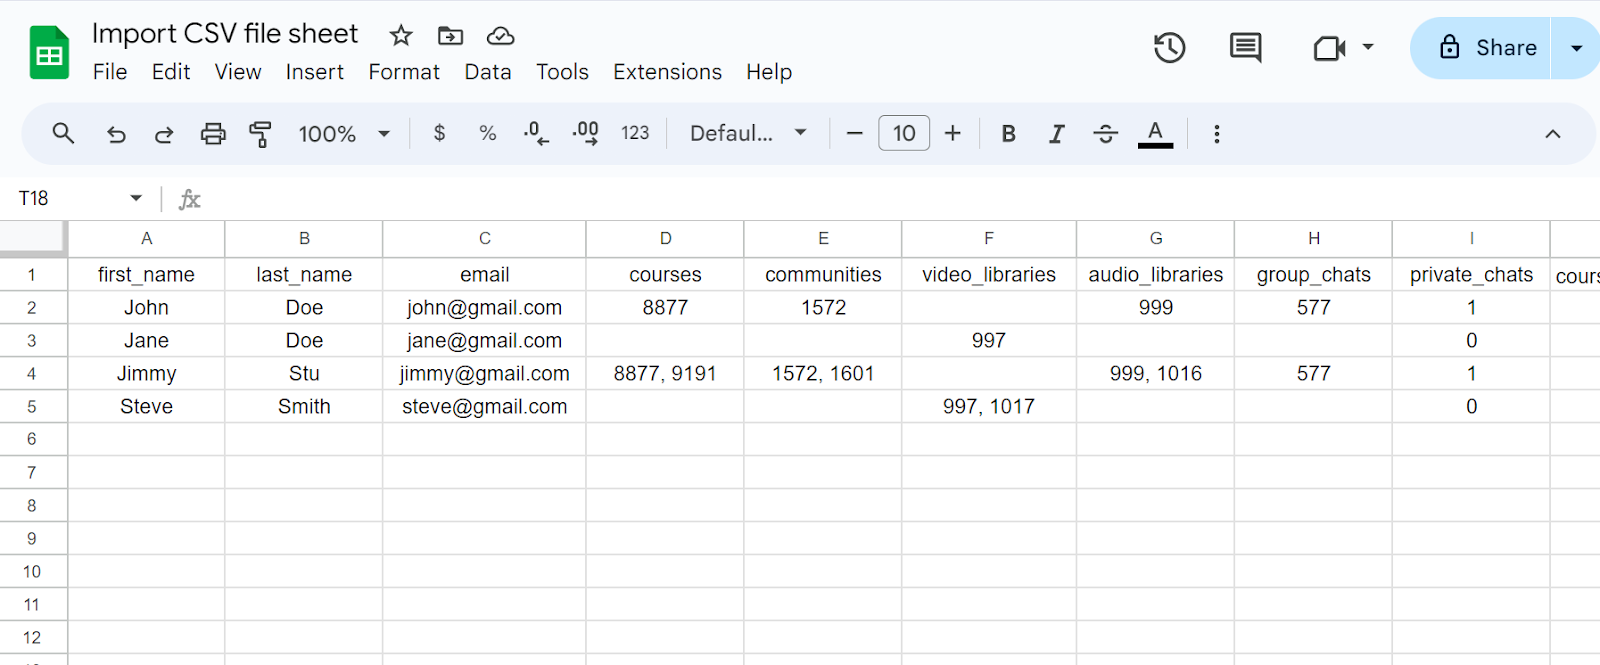
You have to define separate columns for each of the different products. That includes Courses, Communities, Memberships, Video Library, Audio Library, Group Chat, and Private Chat. Of course, you might not need to define all the columns if you are, for example, only enrolling the students into some of the products instead of all.
But, it is possible to enroll your existing students into all the mentioned products simultaneously. The column names for the products should be exactly as follows: courses, communities, video_libraries, audio_libraries, group_chats, and private_chats.
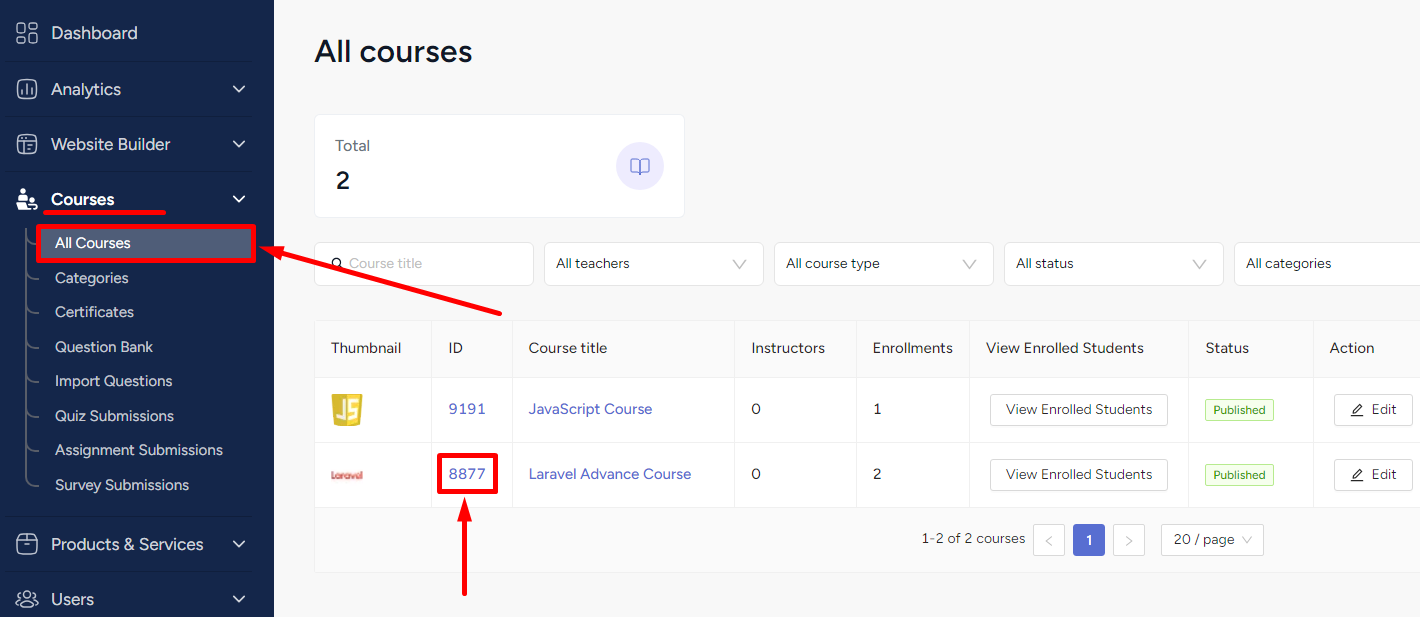
It is important to note that the value of these columns will not be the name of the products. Instead, you have to give the unique ID of the products. You can find the unique product ID for every product type from your dashboard. For example, to find the unique ID of a particular course, go to Courses -> All courses.
To define which product you are enrolling students into, simply give the unique product ID on the correct product column.
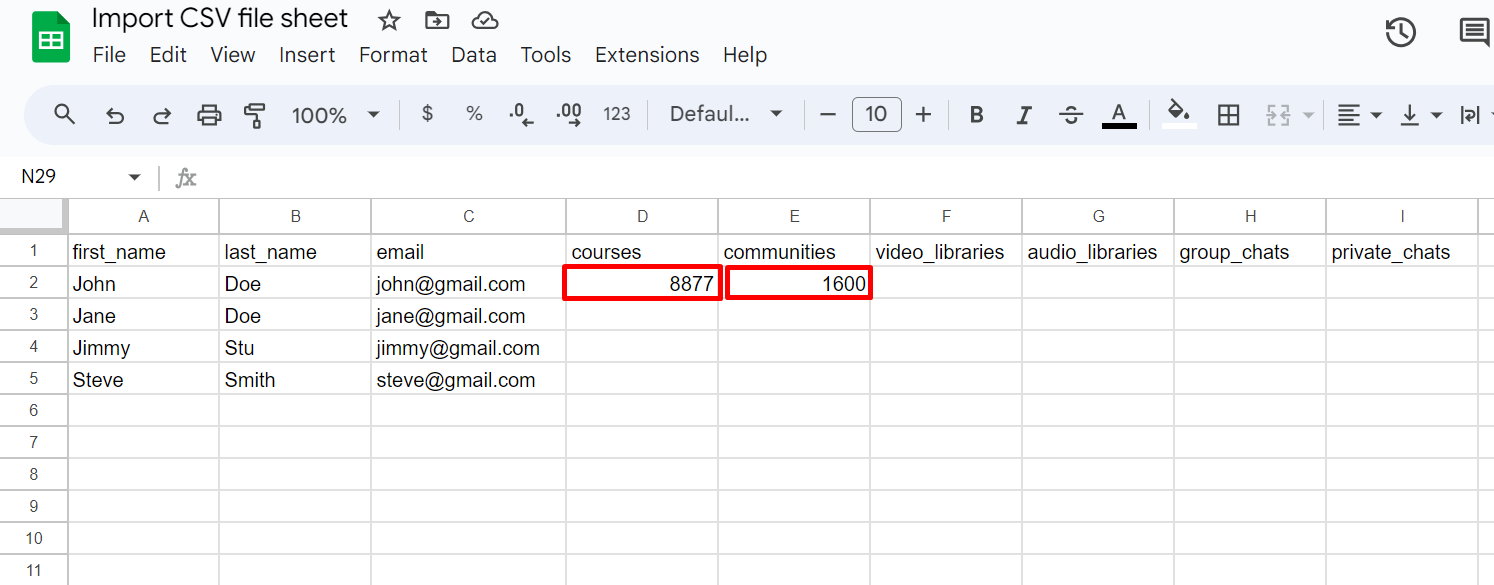
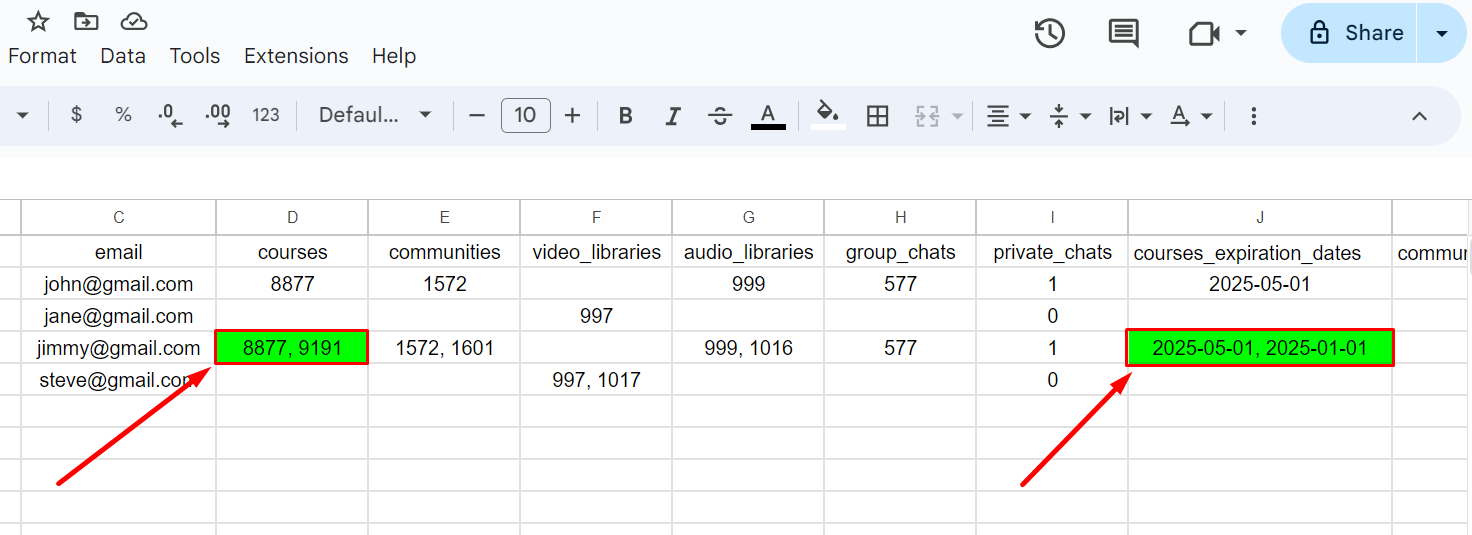
To enroll a student into multiple products (ex: multiple courses, multiple communities, etc.), write the product IDs for each of the products on the row of the student who will get enrolled into those products.
[Note: Separate the unique product IDs by commas when enrolling into multiple products.]
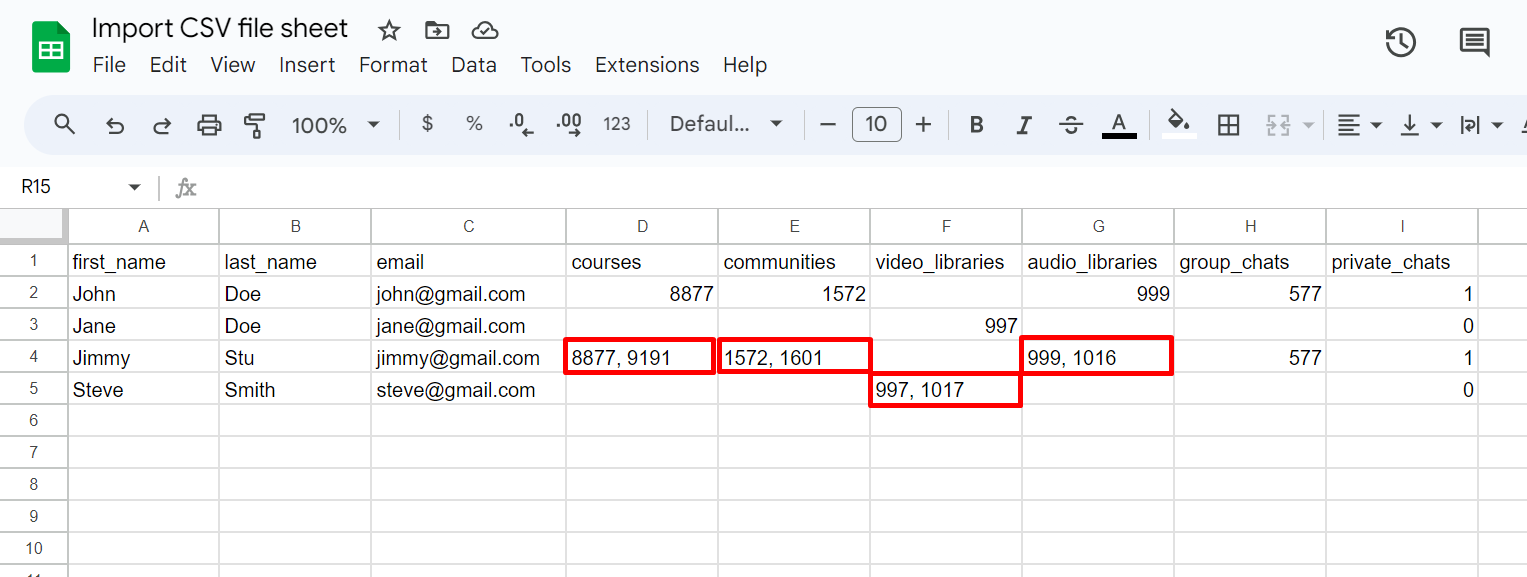
For enrolling or giving access to private chats, simply enter the value 1. You can give 0 to not allow the student private chat access.
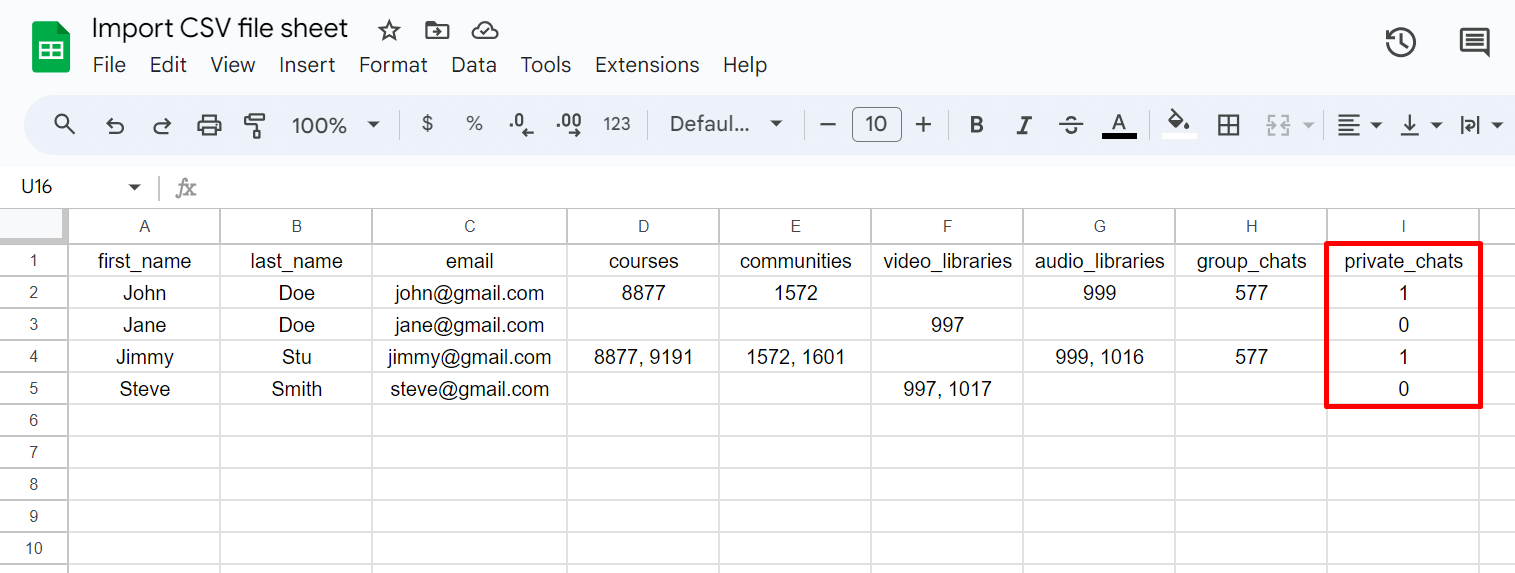
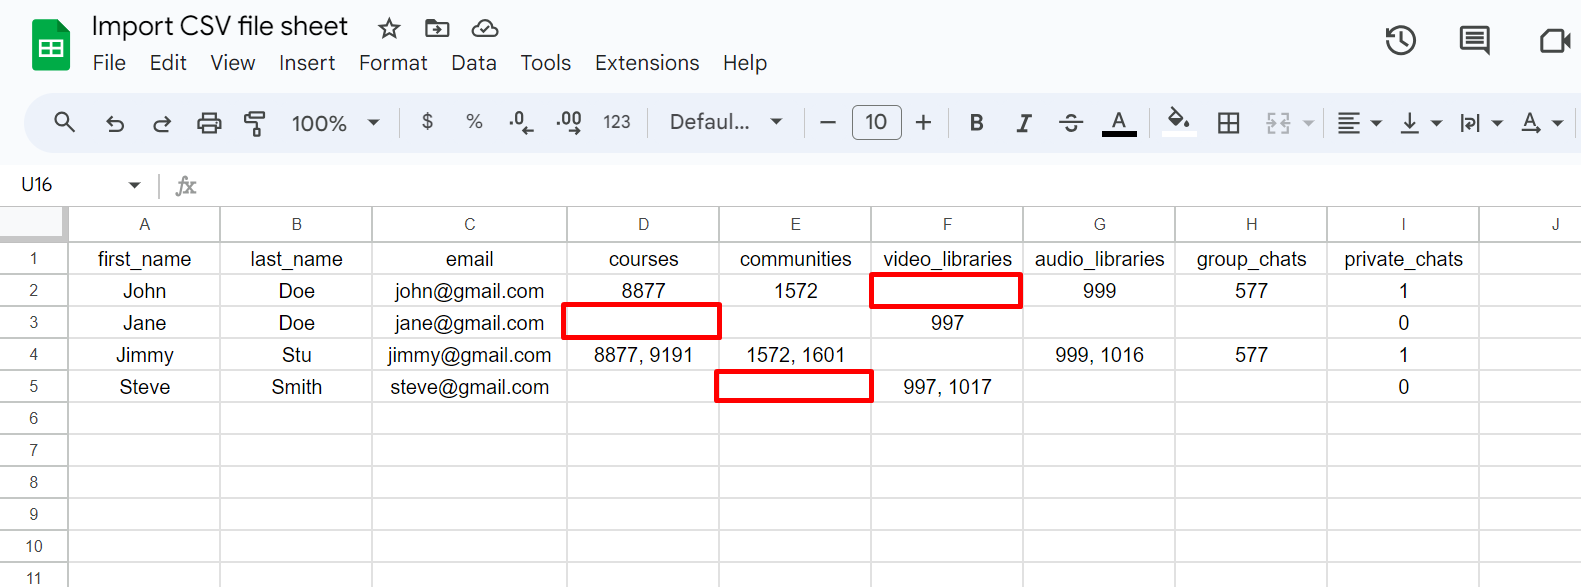
You can leave a cell empty for a particular product column. Then that particular student will not get enrolled into that particular product.
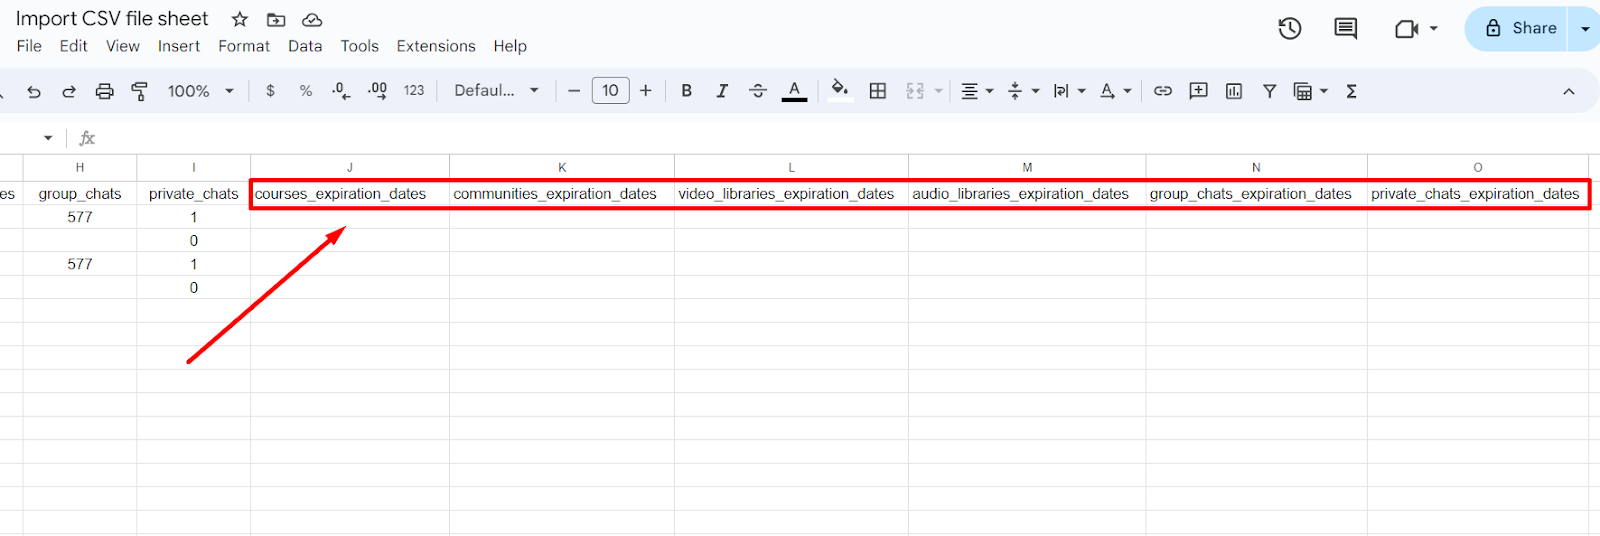
Columns for Product Expiry Date
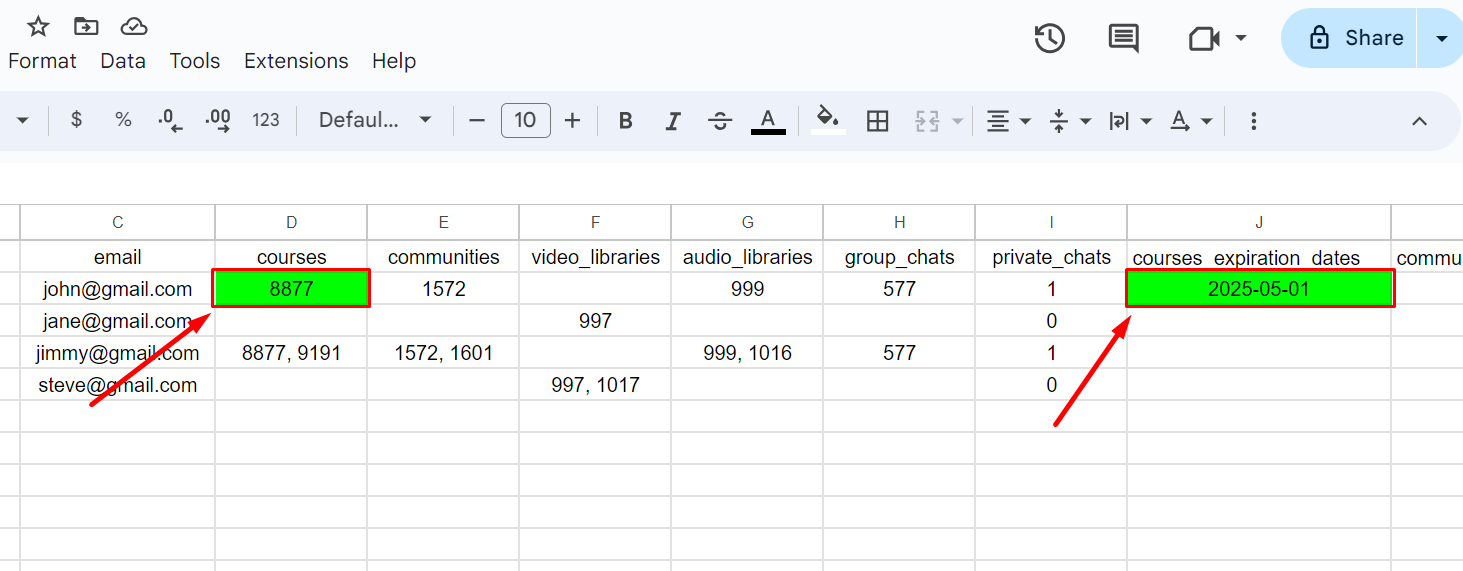
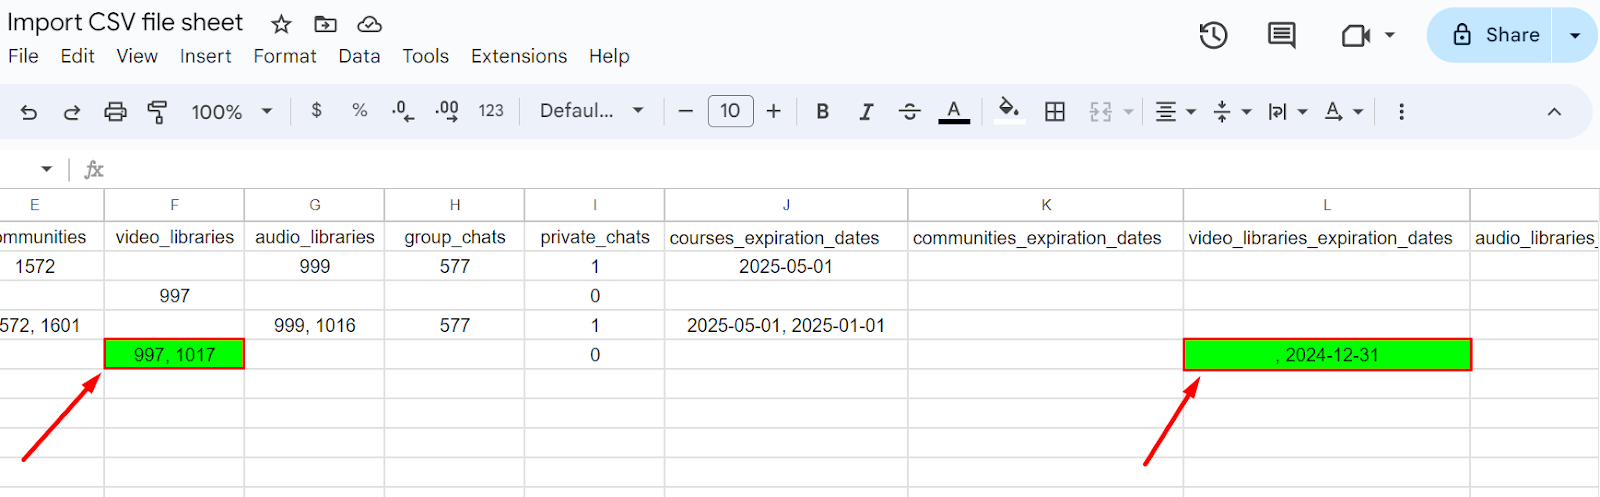
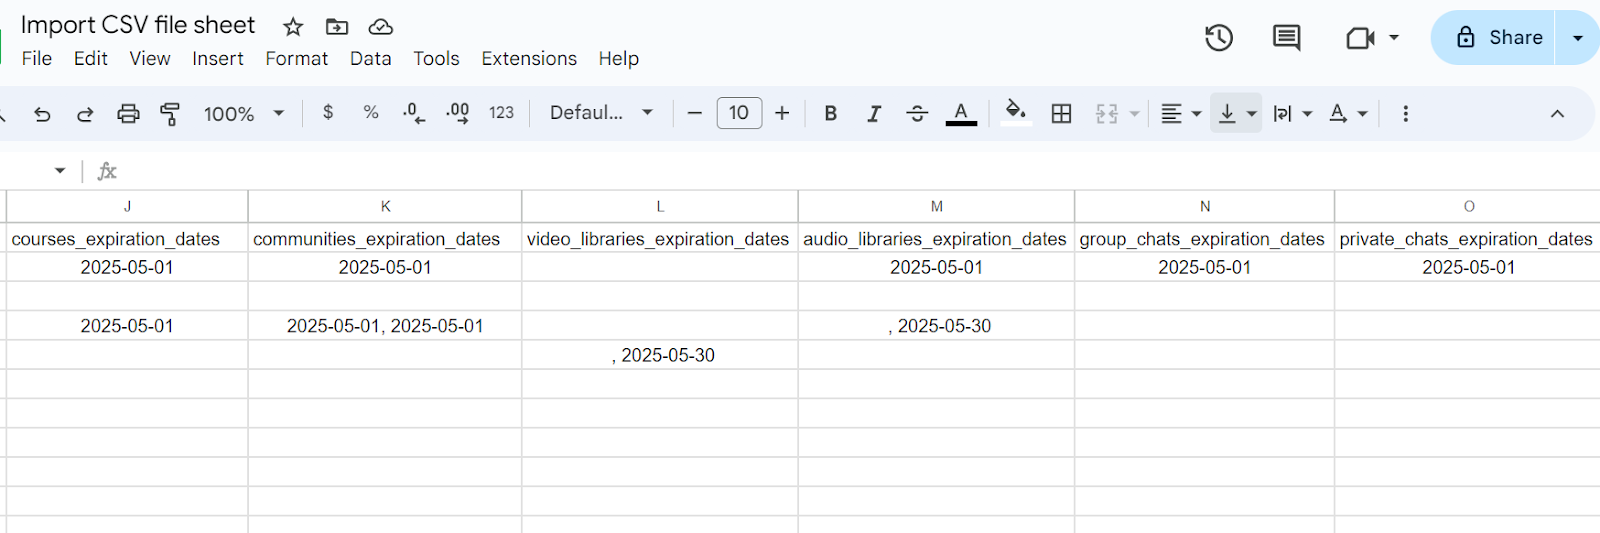
You have to include an additional product expiry date column for each of the product types. That means you have to add more columns which will indicate the time of expiry for the products. The column names should be exactly as follows: courses_expiration_dates, communities_expiration_dates, video_libraries_expiration_dates, audio_libraries_expiration_dates, group_chats_expiration_dates, and private_chats_expiration_dates.
Simply define the expiry date in the YYYY-MM-DD format for a product on the correct expiry date column.
Leaving a cell empty under any expiry date column will result in giving lifetime access to the product.
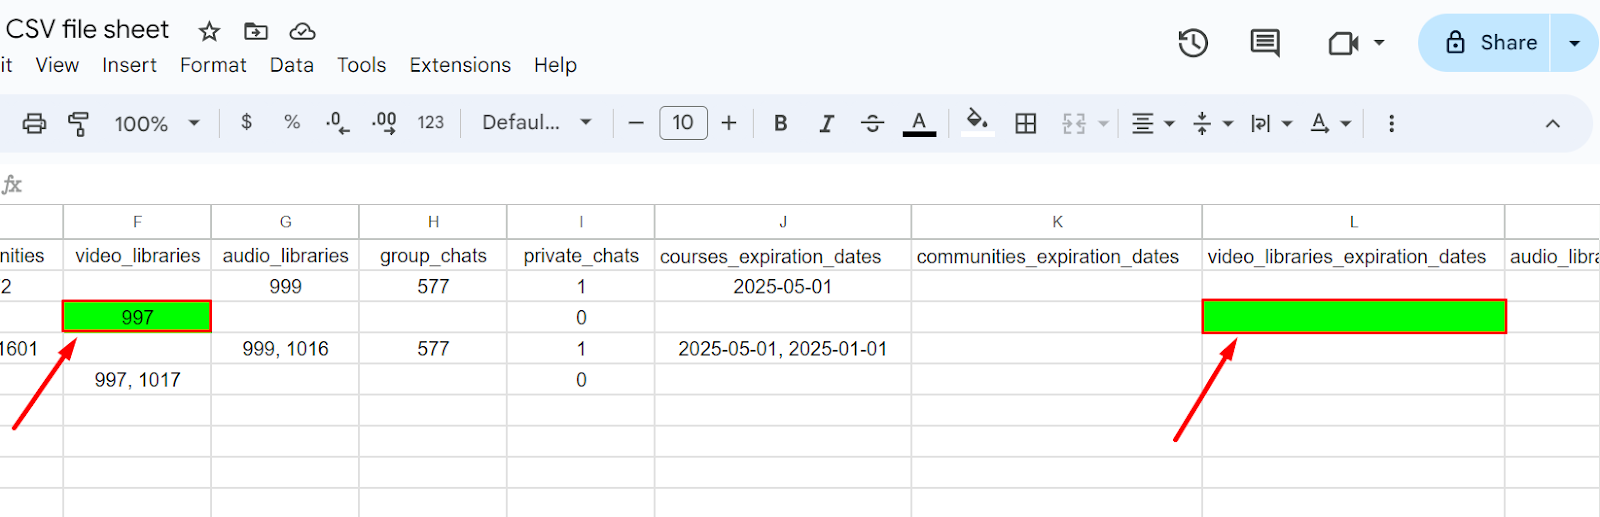
For multiple product enrollment, you can define multiple expiry dates with each one separated by commas.
In case of multiple product enrollments, you can give expiry dates for some products and leave out some if you want to give lifetime access to those products.
Here are some scenarios you might face -
• For two product enrollments, you can give the expiry date for the first one and leave out the next one for lifetime access.
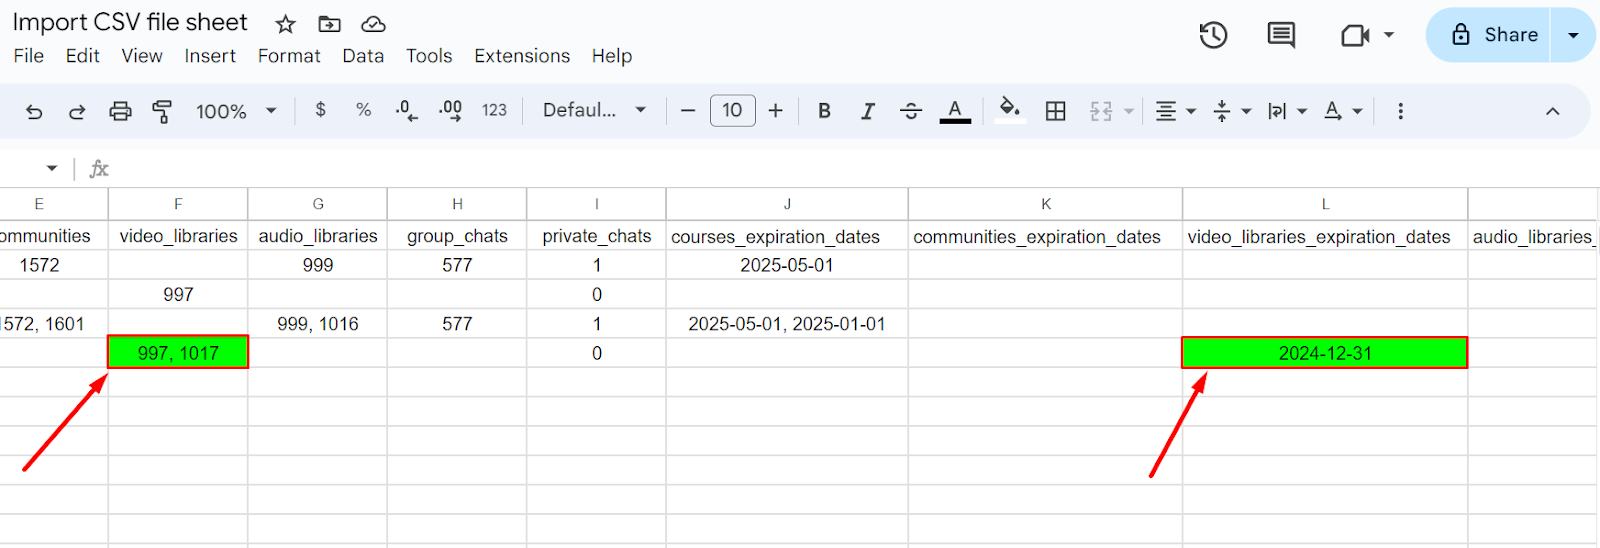
[Note: For giving lifetime access to the last product, do not add any comma after the last date.]
• For giving lifetime access to the first product and setting an expiry date for the second product, simply add a comma before writing the date.
• For giving lifetime access to a product in the middle, simply add the dates for other products sequentially (separated by commas), while leaving the space empty on the lifetime product’s sequence.
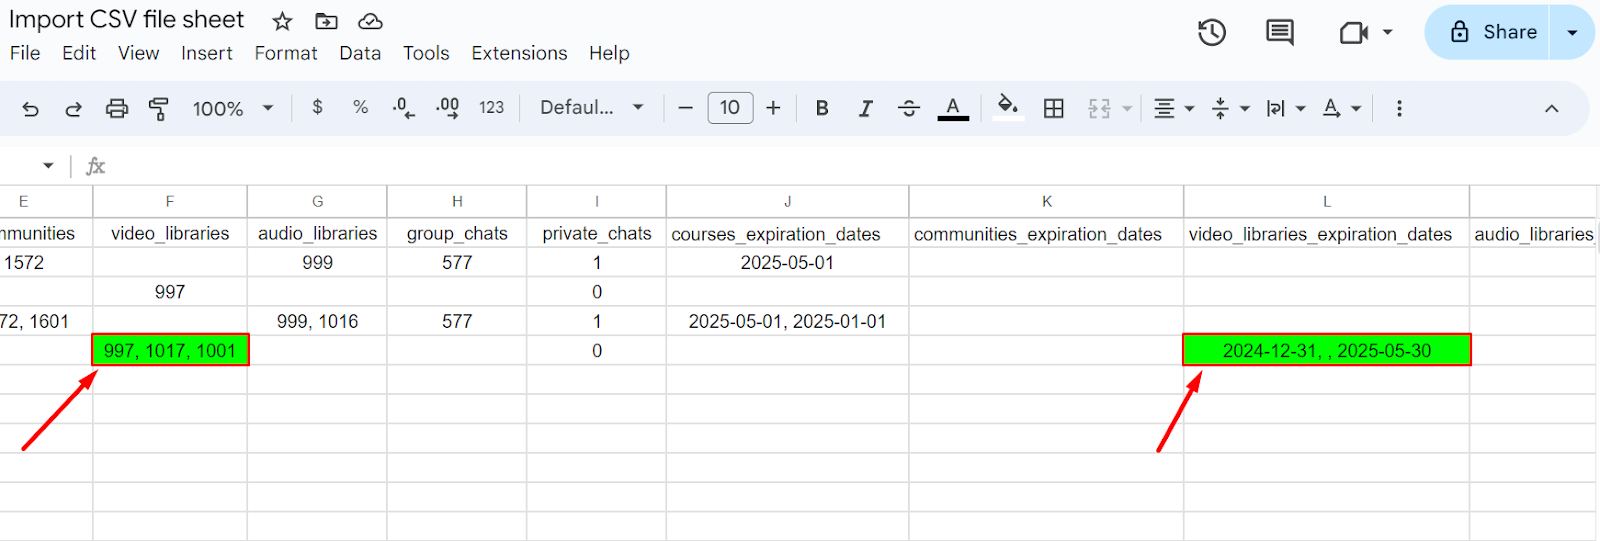
In this way, you can ideally choose to either add the expiry dates for each of the products or give lifetime access. Here’s a final look at our Google Sheet file which is ready to be downloaded as CSV.
Columns for Assigning Tags
With EzyCourse, you can create and use email tags to filter your email campaigns, and target students more specifically. You can assign the existing tags to your students as you are importing with CSV.
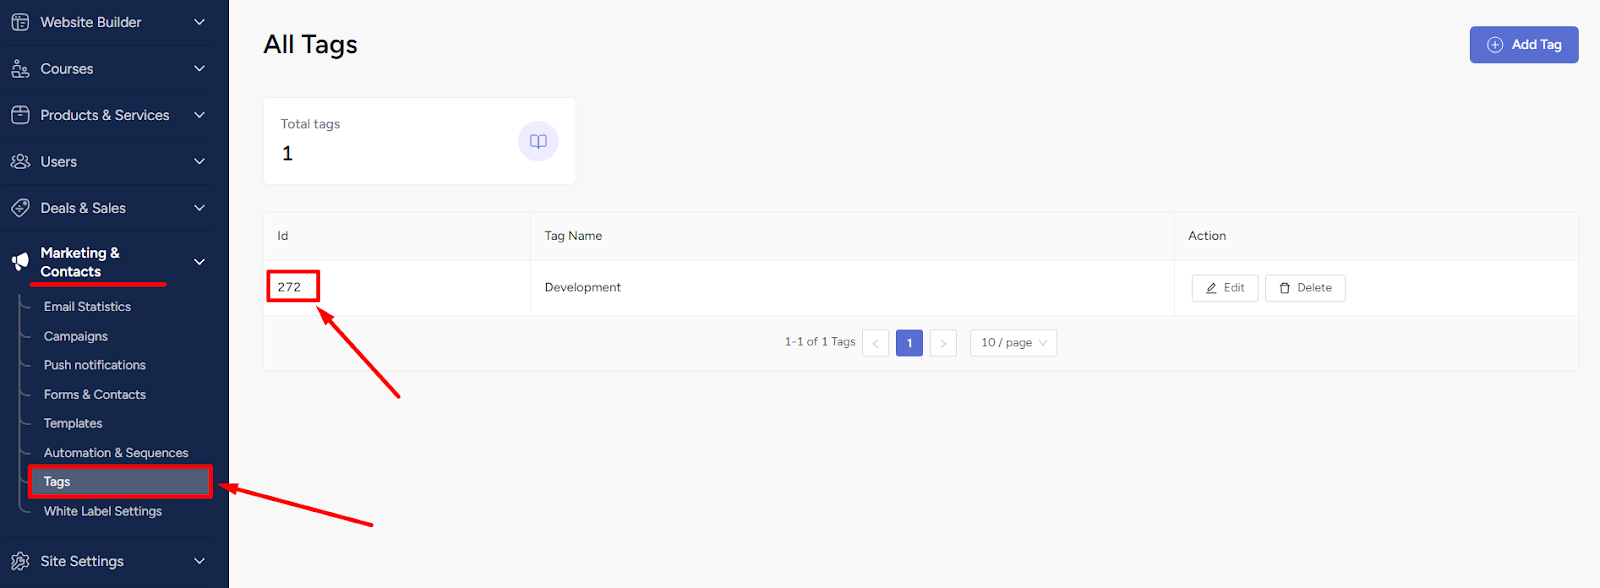
To do that, add a tags column. This column will hold the unique ID of the tag you are assigning. Find the unique ID of a tag from Marketing & Contacts -> Tags.
[Note: You cannot use the tags column on the membership CSV file.]
Membership CSV File
Remember that in terms of enrolling students into membership, you need to make a separate file. All the rules mentioned so far apply to the membership CSV file also.
There should not be any additional columns on this file as you need to use it to only enroll students into memberships on your platform. The columns for membership CSV file are:
• first_name
• last_name
• memberships
• membership_expiration_dates
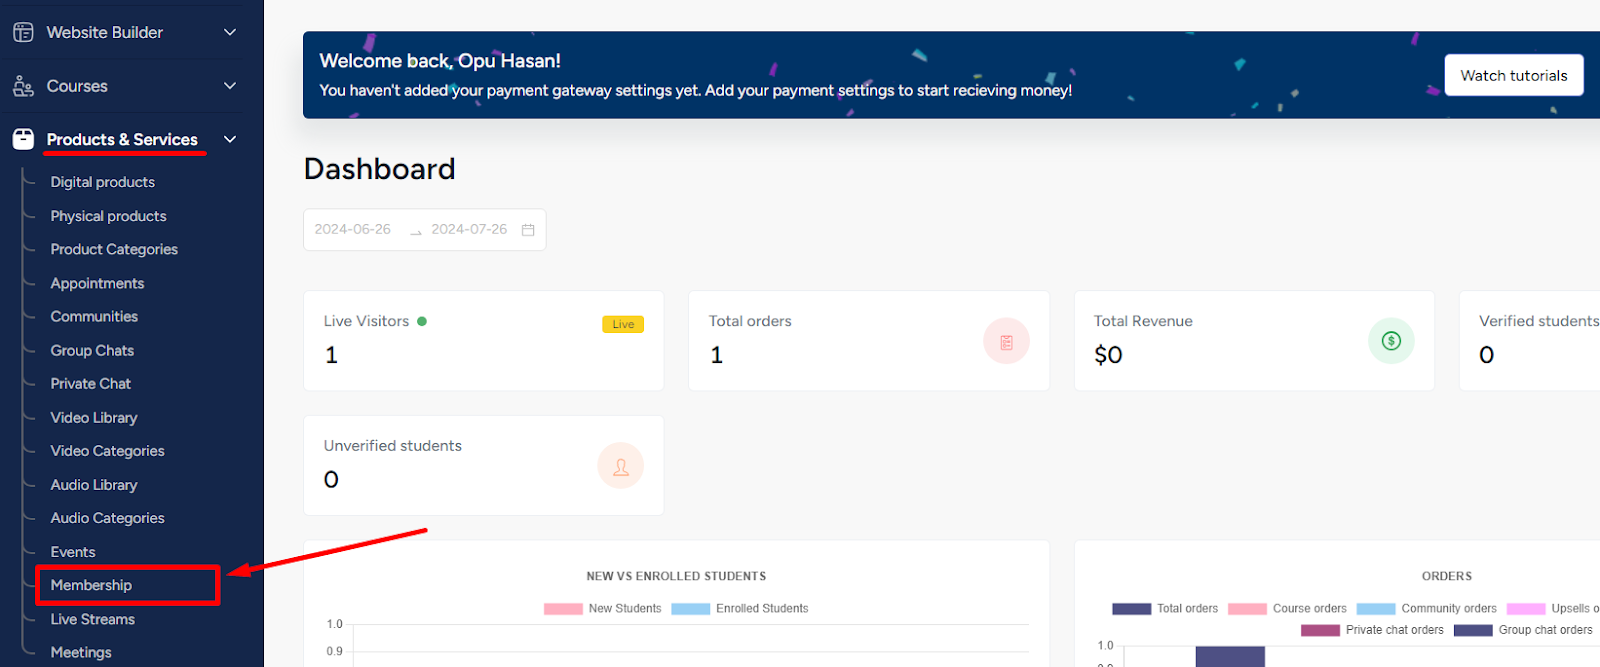
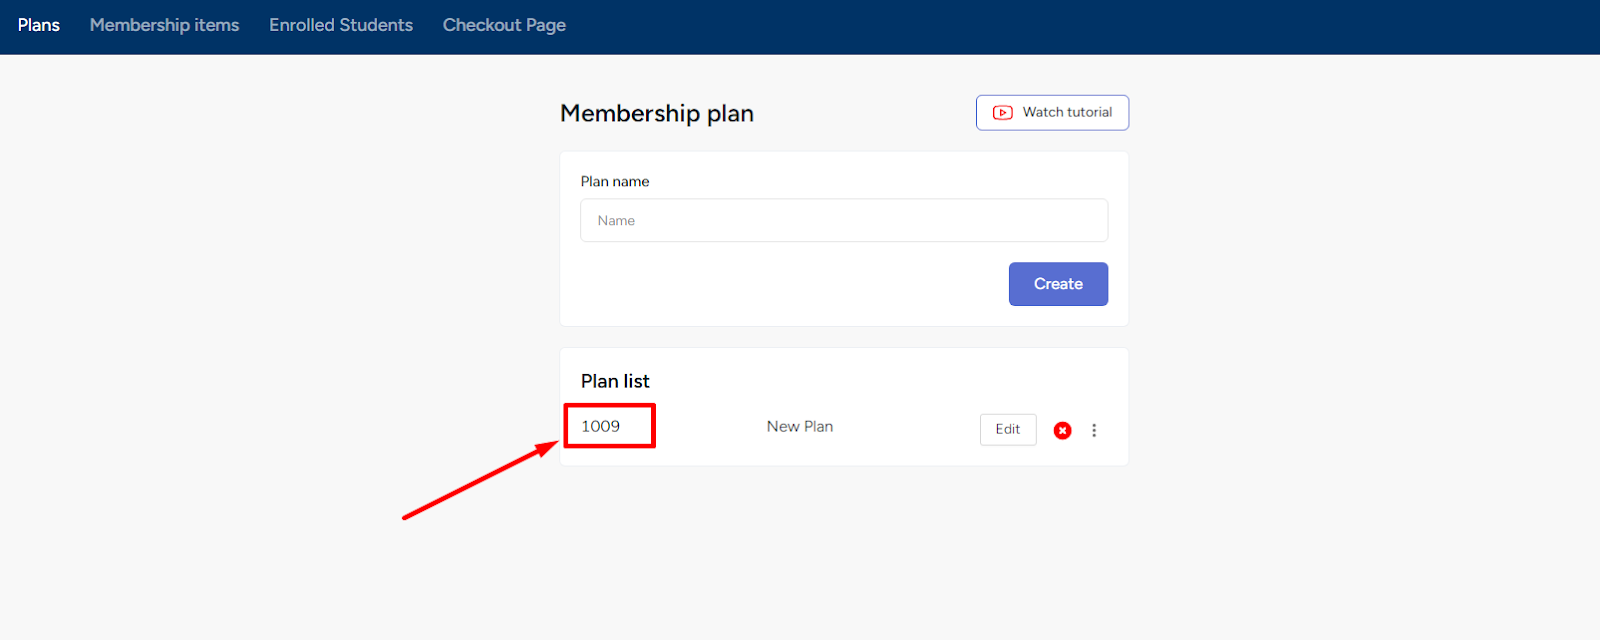
The memberships column is where you give the unique ID of the membership product. To find the unique ID, go to Products & Services -> Membership.
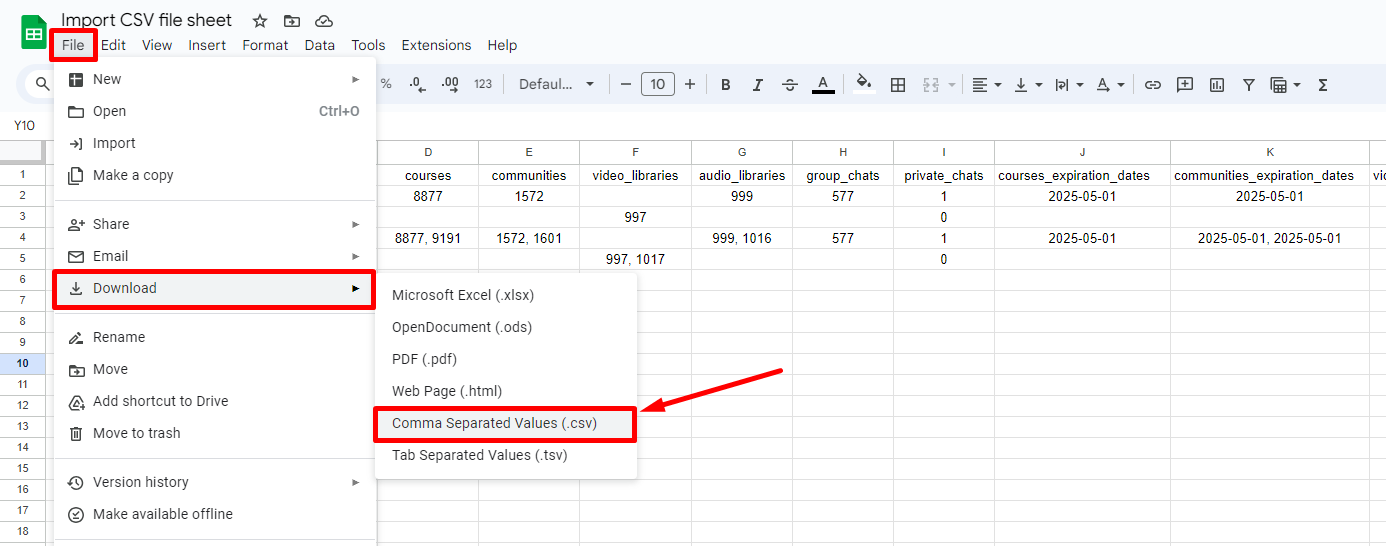
Downloading File as CSV
Once you are done with the editing and ready to import your students, save/download the sheet file first as a CSV file onto your device. To do that, go to File -> Download -> Comma Separated Values (.csv).
And then you can use this file to import your students and effortlessly enroll them into the products.